Image by author
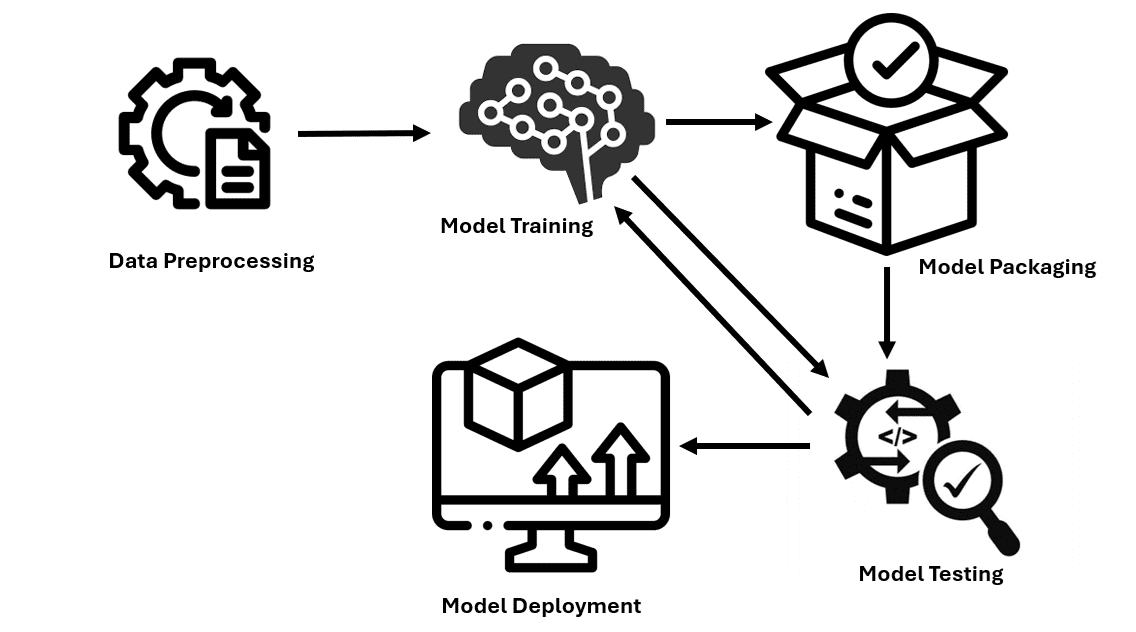
Model deployment is the process of integrating a trained model into a real-world application. It involves defining the required environment, specifying how input data should be introduced into the model to generate output, and its ability to analyze new data and provide relevant predictions or classifications. Let's look at the process of deploying a model into production.
Step 1: Preprocess the data
To handle missing values, impute using the mean or delete rows/columns. Ensure that categorical variables are also transformed from qualitative to quantitative data by One-Hot Encoding or Label Encoding. Normalize and standardize numerical characteristics to convert them to a common scale.
import pandas as pd
from sklearn.impute import SimpleImputer
from sklearn.preprocessing import OneHotEncoder, StandardScaler, MinMaxScaler

# Load your data
df = pd.read_csv('your_data.csv')

# Handle missing values
imputer_mean = SimpleImputer(strategy='mean')
df['numeric_column'] = imputer_mean.fit_transform(df[['numeric_column']])

# Encode categorical variables
one_hot_encoder = OneHotEncoder()
encoded_features = one_hot_encoder.fit_transform(df[['categorical_column']]).toarray()
encoded_df = pd.DataFrame(encoded_features, columns=one_hot_encoder.get_feature_names_out(['categorical_column']))

# Normalize and standardize numerical features
# Standardization (zero mean, unit variance)
scaler = StandardScaler()
df['standardized_column'] = scaler.fit_transform(df[['numeric_column']])

# Normalization (scaling to a range of [0, 1])
normalizer = MinMaxScaler()
df['normalized_column'] = normalizer.fit_transform(df[['numeric_column']])
Step 2: Train and evaluate the model
The data is split into two groups, training and test data sets, and a model is trained. A model is selected and trained to fit the data used. The best performing machine learning model is selected by fine-tuning hyperparameters. The model is checked for stability and cross-validation is performed using different subgroups of data.
import pandas as pd
from sklearn.model_selection import train_test_split, GridSearchCV, cross_val_score
from sklearn.ensemble import RandomForestClassifier
from sklearn.metrics import accuracy_score, precision_score, recall_score
from sklearn.impute import SimpleImputer
from sklearn.preprocessing import OneHotEncoder, StandardScaler, MinMaxScaler

# Load your data
df = pd.read_csv('data.csv')

# Split data into training and testing sets
X = df.drop(columns=['target_column'])
y = df['target_column']

X_train, X_test, y_train, y_test = train_test_split(X, y, test_size=0.2, random_state=42)

# Hyperparameter tuning
param_grid = {
    'n_estimators': [50, 100, 200],
    'max_depth': [None, 10, 20, 30],
    'min_samples_split': [2, 5, 10]
}

grid_search = GridSearchCV(estimator=RandomForestClassifier(random_state=42),
                           param_grid=param_grid,
                           cv=5,
                           scoring='accuracy',
                           n_jobs=-1)

# Fit the grid search to the data
grid_search.fit(X_train, y_train)

# Get the best model from the grid search
best_model = grid_search.best_estimator_

# Cross-validation to assess model generalization and robustness
cv_scores = cross_val_score(best_model, X_train, y_train, cv=5, scoring='accuracy')

print(f"Cross-validation scores: {cv_scores}")
print(f"Mean cross-validation score: {cv_scores.mean()}")
Step 3: Package the model
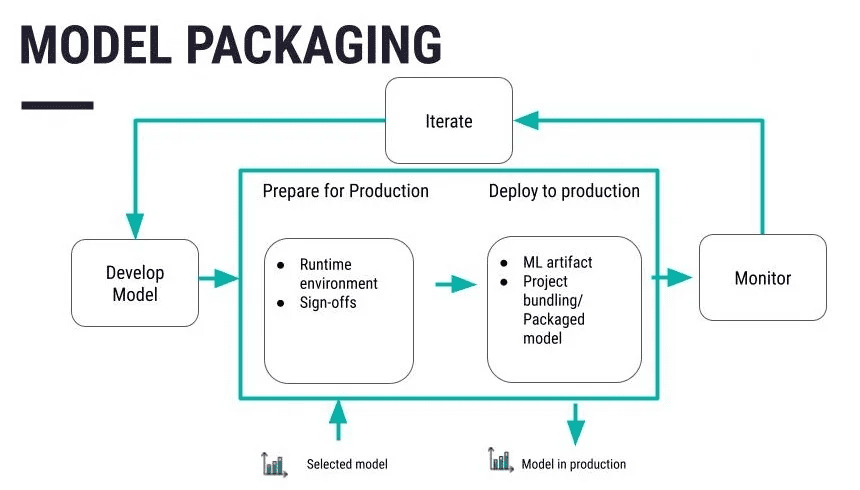
Source: https://knowledge.dataiku.com/latest/mlops-o16n/architecture/concept-model-packaging.html
Serialize your code into a more appropriate format that can be stored or distributed to other systems. Pickle is one of the traditional formats, followed by joblib and ONNX formats based on user requirements. Once your model is defined and optimized, store it in a file or database. Platforms like Git can also help you handle changes and modifications. Apply certain measures like encryption of data both at rest and in transit to ensure that your data is not easily accessible to others.
import joblib

joblib.dump(model, 'model.pkl')
Deploy serialized models in containers such as Docker, which improves portability and makes machine learning models easier to transfer to different environments.
# Docker code
FROM python:3.8-slim
COPY model.pkl /app/model.pkl
COPY app.py /app/app.py
WORKDIR /app
RUN pip install -r requirements.txt
CMD ["python", "app.py"]
Step 4: Configure your environment for deployment
To set up the infrastructure and resources for model deployment, we recommend using cloud services such as AWS, Azure, Google Cloud, etc. Change the components required for hosting your model, such as servers, databases, etc. All this can be done with the appropriate cloud infrastructure services on your cloud platform of choice.
Amazon: Set up an EC2 instance using the AWS CLI
aws ec2 run-instances \
    --image-id ami-0abcdef1234567890 \
    --count 1 \
    --instance-type t2.micro \
    --key-name MyKeyPair \
    --security-group-ids sg-0abcdef1234567890 \
--subnet-id subnet-0abcdef1234567890Azure: Set up a virtual machine using the Azure CLI
az vm create \
  --resource-group myResourceGroup \
  --name myVM \
  --image UbuntuLTS \
  --admin-username azureuser \
  --generate-ssh-keys
Google Cloud: Set up a Compute Engine instance using the Google Cloud CLI
gcloud compute instances create my-instance \
  --zone=us-central1-a \
  --machine-type=e2-medium \
  --subnet=default \
  --network-tier=PREMIUM \
  --maintenance-policy=MIGRATE \
  --image=debian-9-stretch-v20200902 \
  --image-project=debian-cloud \
  --boot-disk-size=10GB \
  --boot-disk-type=pd-standard \
  --boot-disk-device-name=my-instance
Step 5: Build a deployment pipeline
Automate your model deployment steps using Jenkins or GitLab CI/CD, for example. Design a list of steps to execute to make your deployment process more efficient, and use a Jenkinsfile or YAML configuration in the context of GitHub Actions.
# Using Jenkins for CI/CD pipeline
pipeline {
  agent any
  stages {
    stage('Build') {
      steps {
        sh 'python setup.py build'
      }
    }
    stage('Test') {
      steps {
        sh 'python -m unittest discover'
      }
    }
    stage('Deploy') {
      steps {
        sh 'docker build -t mymodel:latest .'
        sh 'docker run -d -p 5000:5000 mymodel:latest'
      }
    }
  }
}
Step 6: Test the model
Run tests to ensure that all the features of the model are properly fulfilled. After that, compare the predicted amounts with the results that this model should deliver. Check the generalization capabilities of the model to see if it works well on other new data. Select the appropriate evaluation metric (Accuracy, Precision, Recall) to compare with the sample data.
# Import necessary libraries
from sklearn.metrics import accuracy_score, precision_score, recall_score

# Load your test data
test_df = pd.read_csv('your_test_data.csv')

X_test = test_df.drop(columns=['target_column'])
y_test = test_df['target_column']

# Predict outcomes on the test set
y_pred_test = best_model.predict(X_test)

# Evaluate performance metrics
test_accuracy = accuracy_score(y_test, y_pred_test)
test_precision = precision_score(y_test, y_pred_test, average="weighted")
test_recall = recall_score(y_test, y_pred_test, average="weighted")

# Print performance metrics
print(f"Test Set Accuracy: {test_accuracy}")
print(f"Test Set Precision: {test_precision}")
print(f"Test Set Recall: {test_recall}")
Step 7: Monitoring and maintenance
Use tools such as AWS CloudWatch, Azure Monitor, and Google Cloud Monitoring to ensure that your model is error-free and shows how future deployed models need to be modified to further improve them.
AWS CloudWatch
aws cloudwatch put-metric-alarm --alarm-name CPUAlarm --metric-name CPUUtilization \
--namespace AWS/EC2 --statistic Average --period 300 --threshold 70 \
--comparison-operator GreaterThanThreshold --dimensions "Name=InstanceId,Value=i-1234567890abcdef0" \
--evaluation-periods 2 --alarm-actions arn:aws:sns:us-east-1:123456789012:my-sns-topic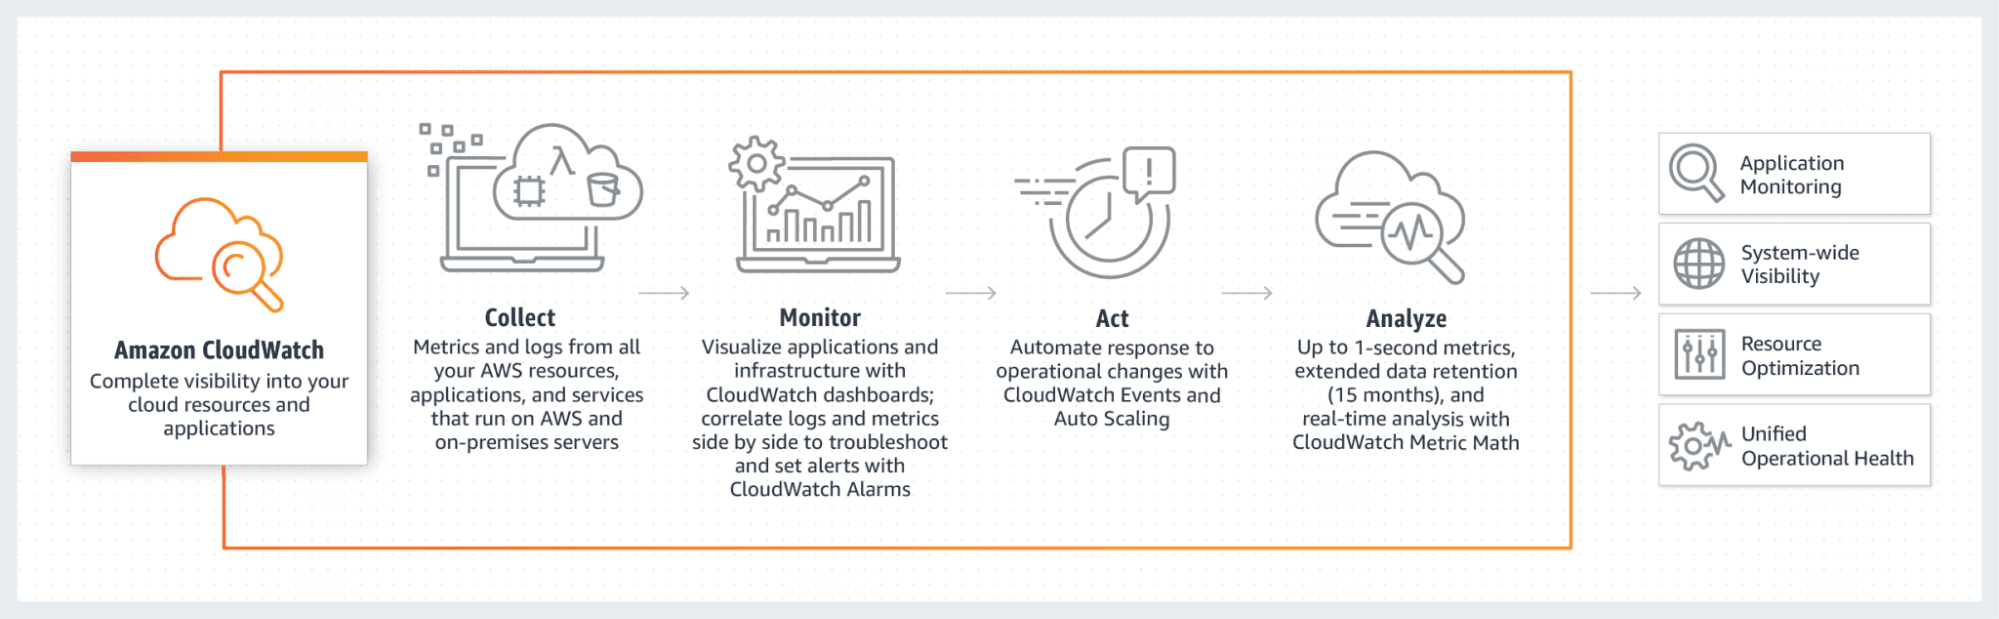
Source: https://blogs.vmware.com/management/2021/03/cloud-services-aws-cloudwatch-azure-monitor.html
Azure Monitor
az monitor metrics alert create --name 'CPU Alert' --resource-group myResourceGroup \
--scopes /subscriptions/{subscription-id}/resourceGroups/{resource-group-name}/providers/Microsoft.Compute/virtualMachines/{vm-name} \
--condition "avg Percentage CPU > 80" --description 'Alert if CPU usage exceeds 80%'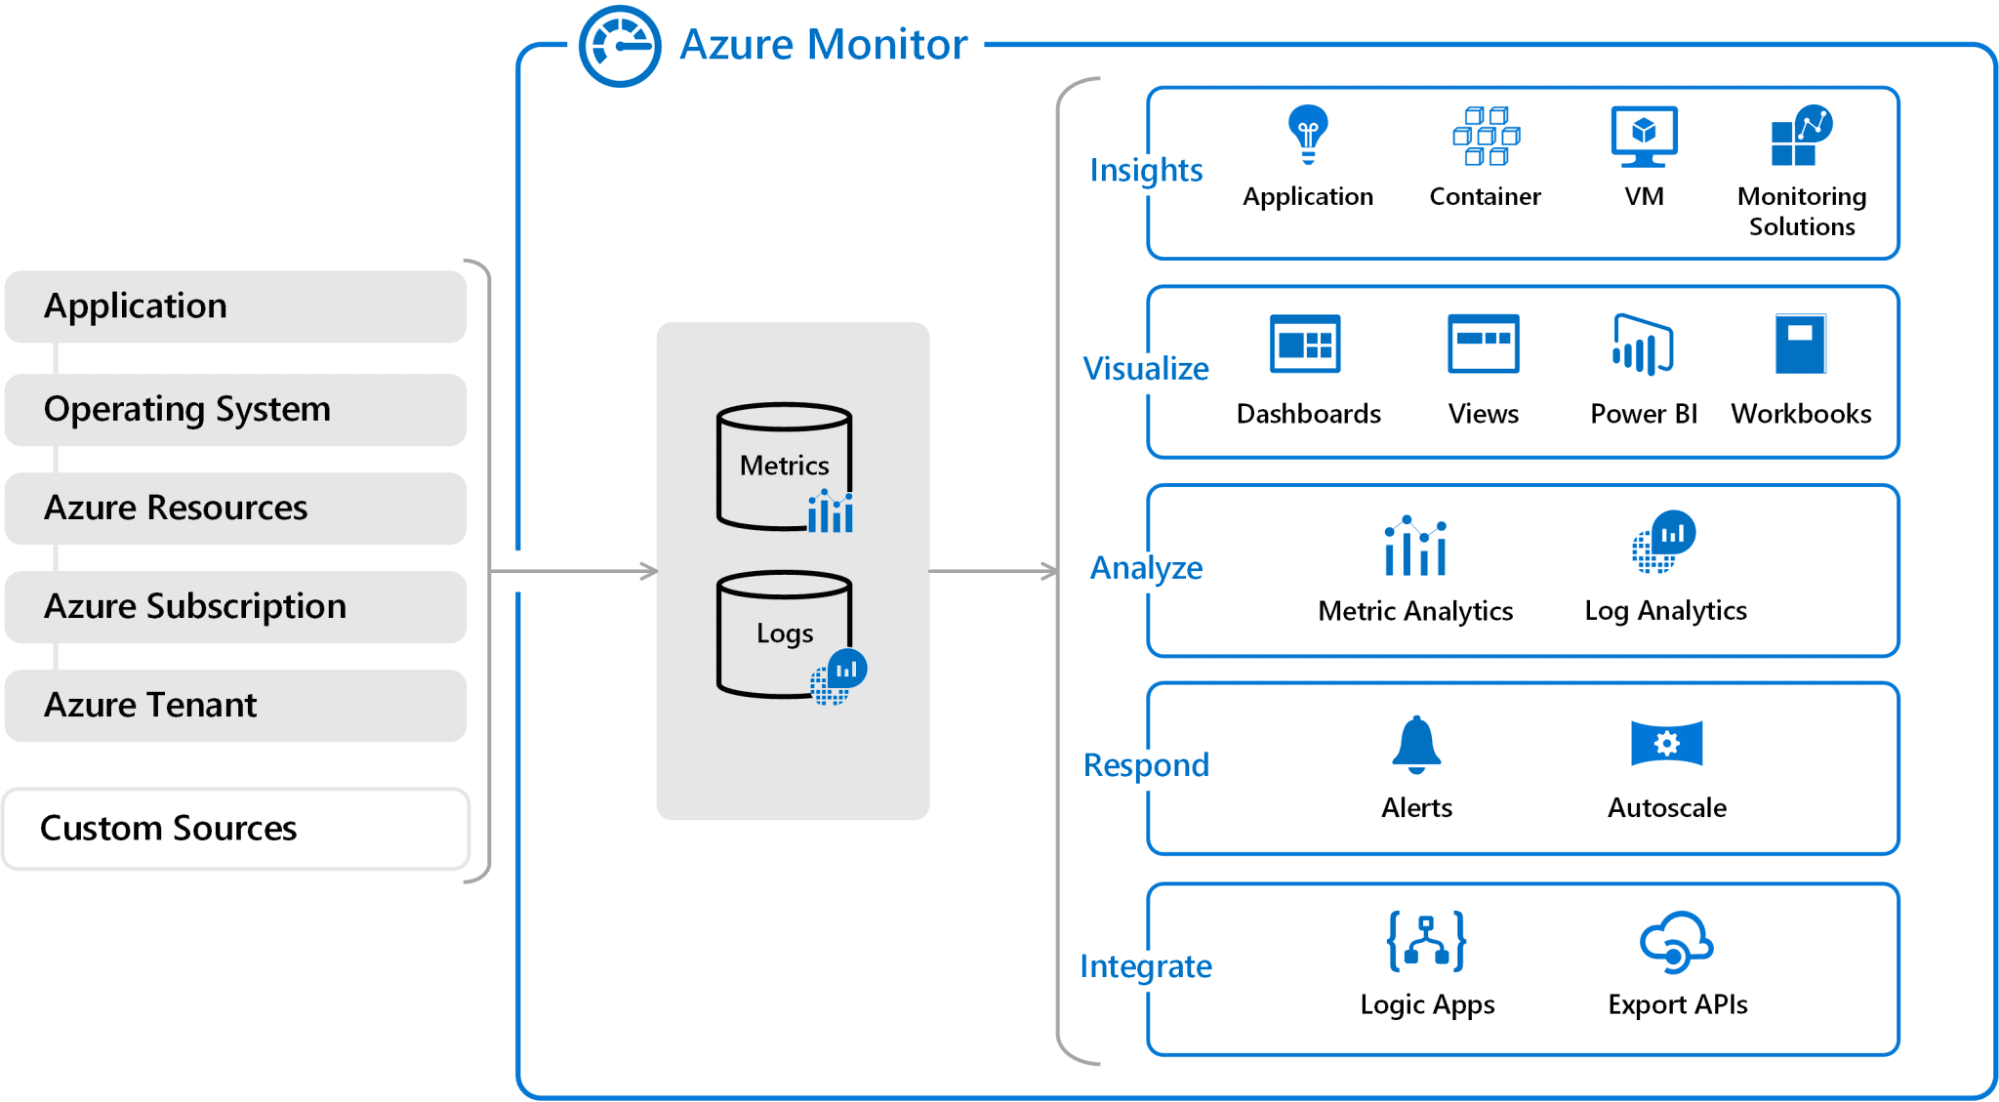
Source: https://blogs.vmware.com/management/2021/03/cloud-services-aws-cloudwatch-azure-monitor.html
summary
The strategy outlined in this tutorial ensures that you take the key steps required to deploy a machine learning model. By following the steps outlined above, you can ensure that your trained model is operational and easily deployable. From building your model to configuring and validating its structure, you now know how to take your machine learning efforts from hypothesis to practice.
Jeita Gulati He is a machine learning enthusiast and technical writer with a passion for building machine learning models. He holds an MSc in Computer Science from the University of Liverpool.