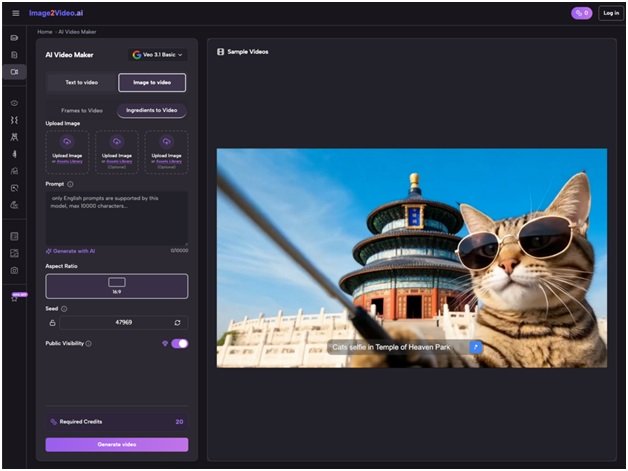


Many beginners get lost staring at the Image to Video AI interface. The promise of turning a single photo into a dynamic clip sounds great, but where do you start? Overly specialized menus, unfamiliar jargon, and fear of wasting time combine to create a high mental barrier. In my early experiments, I remember randomly clicking settings, resulting in choppy transitions and excessively long renders. There is no need to repeat such mistakes.
This section analyzes the main pain points and shows why simple workflows are the key to success.
Common problems
- Too much jargon: Terms like “frame interpolation” and “neural style transfer” can be intimidating.
- Unclear UI: Too many sliders and options without guidance.
- Unrealistic expectations: Expect studio-quality output on the first try.
- Fear of time loss: Long processing times seem like a trap.
- Lack of a quick strategy: We don’t know how to guide AI effectively.
Step-by-step guide to your first image-to-video AI project
You don’t need a computer science degree to start converting images to video. With four clear steps, you’ll have your first clip in less than 10 minutes, with no prior experience required.
Step 1: Upload your image
- Choose a sharp JPEG or PNG and think about a simple composition.
- Click Upload and wait a few seconds for a preview to appear.
- Avoid images with cluttered backgrounds. Get the best animation from beautiful subjects.
Step 2: Create a prompt
Your text instructions are the AI’s instruction manual. A good prompt might be, “Animate this product photo by slowly zooming in and gradually fading to white.” I find that short, specific sentences are more effective than long paragraphs. Be sure to mention style (e.g., smooth, cinematic), movement (e.g., pan, zoom), and atmosphere (e.g., warm, energetic).
Step 3: Let the AI work its magic
After you click Generate, the Image to Video AI platform will display a Processing status. This typically takes about 5 minutes. During this time, the system analyzes your photos and prompts and applies intelligent transitions and effects. Feel free to grab a coffee and plan your next upload.
Step 4: Review and share
Once the status is ‘Completed’, preview the video on your dashboard. Look for smooth transitions, precise movements, and correct tones. If something doesn’t seem right, adjust the prompt or replace the image. Otherwise, you can download the MP4 and share it on social media, embed it in a presentation, or send it to your clients.
Main mistakes and how to overcome them
Avoiding common pitfalls will save you frustration and time. Here are the three biggest mistakes I made when first considering converting photos to video, and how to avoid them.
Mistake 1: Ignoring quick planning
Treat prompts like storyboards. If you rush this step, the results were common. Instead, list your desired moves and style tips before typing. A simple checklist includes:
- Subject focus (center, offset)
- Camera movement (zoom, pan, rotate)
- Transition type (fade, cut, wipe)
- Color atmosphere (warm colors, cool colors, high contrast)
Mistake 2: Ignoring formal requirements
Uploading unsupported files will result in errors and loss of time. Always use JPEG or PNG input. Please pay attention to the image resolution. A crisp 1080×1080 is good for square social posts, and 1920×1080 is perfect for widescreen videos. This simple step will help the Image to Video AI engine process your files smoothly.
Mistake 3: Expecting instant perfection
Early deliverables rarely match the final vision. One project had hoped for a cinematic release, but instead a hoppy clip was created. What is the solution? Repeat. Adjust prompts, swap background colors, adjust effects, and reprocess. In many cases, a few easy rounds will give you polished results.
common misconceptions
- “AI decides everything.” In reality, it guides the results according to its own instructions.
- “High-end hardware is required.” The tool is completely web-based and does not require a GPU.
- “For use by professionals only.” A clear workflow allows anyone to create engaging videos.
Real-world applications and benefits
Image to Video AI enables cost-effective and rapid content creation for a variety of use cases.
For marketers and businesses
- Convert product images into dynamic ads.
- Create bulk photo-to-video campaigns in minutes.
- Test multiple creative concepts without hiring a videographer.
For content creators and YouTubers
- Turn your travel snaps into a video blog introduction.
- Animate your thumbnails to increase click-through rates.
- Create storytelling montages from image sequences.
For educators and trainers
- Bring your diagrams to life with online lessons.
- Convert static infographics into animated explanations.
- In addition to slides, you can use moving visuals to attract students’ attention.
For social media managers
- Keep your feed fresh with quick and eye-catching clips.
- Optimize your videos for Instagram Stories, TikTok, and Facebook.
- Maintain a consistent content schedule without outsourcing.
For personal projects and memories
- Create an anniversary video from your family album.
- Create a “photo video with music” montage for gifts.
- Share heartwarming clips of your travels and milestones.
For e-commerce and product showcases
- Create interactive 360° product views.
- Build an unpacking sequence from a set of images.
- Display new information with animated transitions.
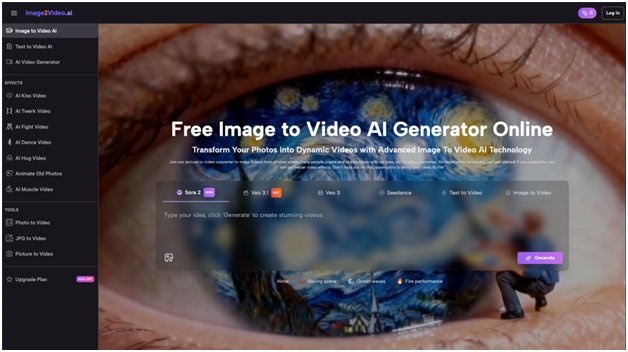
Practical tips to maximize efficiency
Whether you’re a freelancer or a solopreneur, use Image to Video AI to increase your productivity with these easy wins.
Checklist for speedy creation
- Please pre-select 5-10 photos before logging in.
- Draft a prompt template (for example, “Zoom in slowly to the center”).
- Use the default rendering quality for drafts and switch to high quality for final export.
- Batch generate videos by queuing multiple projects.
- Save the prompts and results spreadsheet for future reference.
Ready-to-use hacks
- Add style references (e.g. “Inspired by documentary films”).
- Mention pacing (e.g. “2 seconds per movement”).
- Specify a color filter (e.g. “warm sunset tones”).
Efficiency workflow
- Morning: Plan your video needs for the week.
- Noon: Batch upload and write prompts.
- Afternoon: Review what’s completed and schedule posts.
First Person POV: My Early Victories
When I first tried Image to Video AI, I was skeptical. My company needed a quick demo, but hiring a videographer wasn’t an option. After some experimentation, I found that by focusing on one element at a time, I could quickly create shareable clips by simply zooming. Within a week, we created a mini-library of animated product showcases that outperformed static ads by 30% in engagement.
Bottom line: Adopt a simple workflow to reap big benefits
Image to Video AI doesn’t have to be scary. By understanding common pitfalls, following a clear four-step process, and leveraging real-world examples, you can turn your photo-to-video task into an efficient routine. Remember, perfection comes through repetition, not instant magic. Start small, plan your prompts, and observe how dynamic content creation can be both cost-effective and time-saving. With these strategies, you won’t need a technical degree and will be ready to take advantage of the full potential of photo to video conversion.

advertisement

advertisement
advertisement