Amazon Bedrock Custom Model Import now supports open-weight OpenAI models, including GPT-OSS variants with 20 billion and 120 billion parameters. The GPT-OSS model provides inference capabilities and can be used with the OpenAI Chat Completions API. By maintaining full OpenAI API compatibility, organizations can migrate existing applications to AWS for enterprise-grade security, scale, and cost control.
This post shows you how to deploy a GPT-OSS-20B model to Amazon Bedrock using custom model import while maintaining full API compatibility with your current application.
Overview of importing Amazon Bedrock custom models
Amazon Bedrock Custom Model Import allows you to bring your customized models into the same serverless environment where you access the underlying model (FM). One unified API for everything. There’s no need to juggle multiple endpoints or manage separate infrastructure.
To use this feature, upload your model files to Amazon Simple Storage Service (Amazon S3) and initiate the import through the Amazon Bedrock console. AWS handles the heavy lifting, such as provisioning GPUs, configuring inference servers, and automatically scaling based on demand. You can focus on your applications while AWS manages your infrastructure.
The GPT-OSS model supports the OpenAI Chat Completion API, which includes a standard response structure that includes message arrays, role definitions (system, user, or assistant), and token usage metrics. You can point your application to an Amazon Bedrock endpoint and it will work with minimal changes to your codebase.
GPT-OSS model overview
The GPT-OSS model is OpenAI’s first openweight language model since GPT-2, released under the Apache 2.0 license. You can download, modify, and use it at no additional cost, including commercial applications. These models focus on reasoning, tool usage, and efficient deployment. Please choose the appropriate model according to your needs.
- GPT-OSS-20B (21 billion parameters) – This model is ideal for applications where speed and efficiency are paramount. Despite having 21 billion parameters, only 3.6 billion are activated per token, so it runs smoothly even on edge devices with just 16 GB of memory. With 24 layers, 32 experts (4 active per token), and 128k context windows, it matches OpenAI’s o3-mini performance and can be deployed locally for faster response times.
- GPT-OSS-120B (117 billion parameters) – Built for complex inference tasks such as coding, mathematics, and using agent tools, activating 5.1 billion parameters per token. With 36 layers, 128 experts (4 active per token), and 128k context windows, it rivals OpenAI’s o4-mini performance while running efficiently on a single 80 GB GPU.
Both models use a mixed-of-experts (MoE) architecture. This means that subsets of the model’s components (experts) handle different types of tasks, and only the most relevant experts are activated for each request. This approach provides strong performance while keeping computational costs manageable.
Understand the GPT-OSS model format
When you download the GPT-OSS model from Hugging Face, you get several file types that work together.
- Weights file (.safetensors) – Actual model parameters
- Configuration file (config.json) – Settings that define how the model behaves
- tokenizer file – Handle text processing
- Index file (model.safetensors.index.json) – Map weight data to specific files
Index files require a specific structure to work with Amazon Bedrock. must contain metadata Root level field. This can be empty ({}), or the total size of the model (must be less than 200 GB for text models).
Hugging Face models may include additional metadata fields, such as: total_parameters Amazon Bedrock is not supported. These must be removed before importing. The correct structure looks like the following code.
Be sure to exclude metal Before you start the Amazon S3 upload, navigate to your directory.
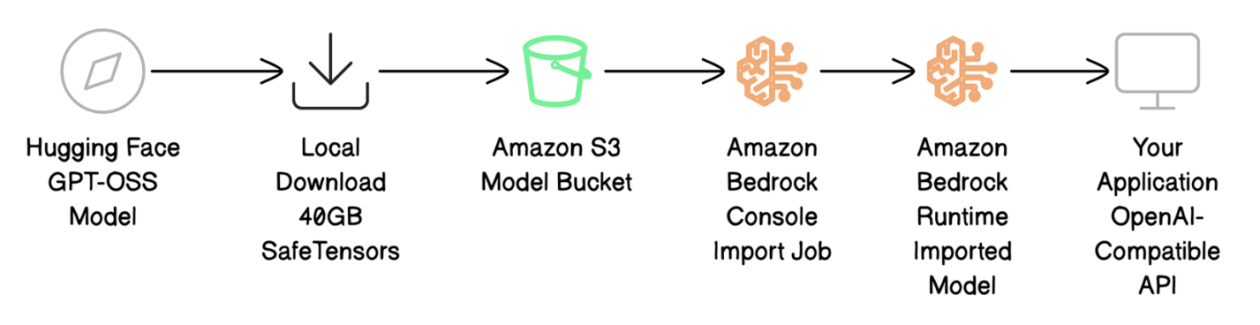
Solution overview
This post walks you through the complete deployment process using Amazon Bedrock Custom Model Import. We use the Tonic/med-gpt-oss-20b model, a fine-tuned version of OpenAI’s GPT-OSS-20B specifically optimized for medical reasoning and following instructions.
The deployment process includes four major steps:
- Download the model file from Hugging Face and prepare it for AWS.
- Upload the model file to Amazon S3.
- Import using Amazon Bedrock Custom Model Import to bring your model into Amazon Bedrock.
- Test your deployment by calling your model using OpenAI-compatible API calls.
The following diagram shows the deployment workflow.

Prerequisites
Before you start deploying your GPT-OSS model, make sure you have the following:
- An active AWS account with appropriate permissions
- AWS Identity and Access Management (IAM) permissions:
- Create a model import job in Amazon Bedrock
- Upload files to Amazon S3
- Call the model after deployment
- Use a custom model import service role
- S3 bucket in target AWS Region
- Approximately 40 GB of local disk space for model downloads
- Access to the US East 1 (N. Virginia) region (required for GPT-OSS based custom models)
- AWS Command Line Interface (AWS CLI) version 2.x installed
- Hugging Face CLI (install using the following command)
pip install -U "huggingface_hub[cli]")
Download and prepare model files
To download a GPT-OSS model using the Hugging Face Hub library with fast transfer enabled, use the following code:
Once the download is complete (10-20 minutes for 40 GB), model.safetensors.index.json File structure. Edit as necessary and metadata Field exists (can be empty):
Upload the model file to Amazon S3
Before you import your model, you must save your model file to an S3 bucket that Amazon Bedrock can access. Follow these steps:
- In the Amazon S3 console, choose: bucket in the navigation pane.
- Create a new bucket or open an existing bucket.
- Upload your model file.
Alternatively, use the AWS CLI to upload files to an S3 bucket in your target Amazon Bedrock region.
Uploading 40 GB typically takes 5 to 10 minutes. Verify that the file is uploaded.
The following screenshot shows an example of files in an S3 bucket.

Note the S3 URI (e.g. s3://amzn-s3-demo-bucket/med-gpt-oss-20b/) for import jobs.
The output file is encrypted using the S3 bucket’s encryption settings. These are encrypted with either SSE-S3 server-side encryption or AWS Key Management Service (AWS KMS) SSE-KMS encryption, depending on how your S3 bucket is configured.
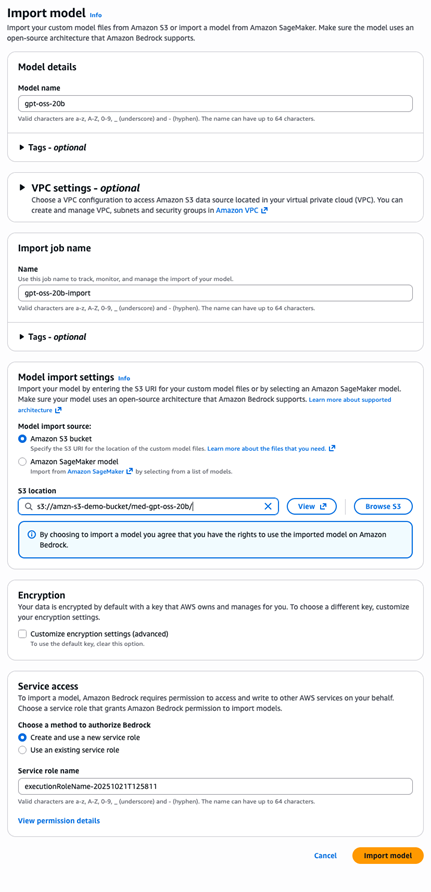
Import a model using Amazon Bedrock Custom Import
Now that your model files are uploaded to Amazon S3, you can import the model into Amazon Bedrock where it can be processed and used for inference. Follow these steps:
- In the Amazon Bedrock console, imported model in the navigation pane.
- choose import model.
- for Model nameinput
gpt-oss-20b. - for Import model fromselect Amazon S3 bucket.
- for S3 locationinput
s3://amzn-s3-demo-bucket/med-gpt-oss-20b/. - for service accessselect Create and use a new service role. The Amazon Bedrock console automatically generates a role with the correct trust relationships and Amazon S3 read permissions.
- choose import model Click to start the import job.
To use the AWS CLI, use the following code.
Model import typically takes 10 to 15 minutes for a 20B parameter model. You can monitor progress using the Amazon Bedrock console or the AWS CLI. Once completed, please note importedModelArnused to call the model.
Invoking models with OpenAI compatible APIs
Once you’ve imported your model, you can test it using the familiar OpenAI Chat Completions API format to ensure it works as expected.
- create a file named
test-request.jsonWith the following content:
- Use the AWS CLI to make requests to the imported model’s endpoints.
Responses are returned in standard OpenAI format.
The response structure matches exactly the OpenAI format.choices Contains the response, usage provide the number of tokens, finish_reason Indicates completion status. Existing OpenAI response parsing code will work without modification.
A strong advantage of this model is its transparency. of reasoning_content Fields provide information about the model’s internal reasoning processes before producing the final response. This level of transparency is not available with closed source APIs.
cleaning
When you’re done, clean up your resources to avoid unnecessary charges.
If you no longer need an IAM role, delete it using the IAM console.
Migrating from OpenAI to Amazon Bedrock
Migrating from OpenAI requires minimal code changes. Only the calling method has changed, the message structure remains the same.
For OpenAI, use the following code:
For Amazon Bedrock, use the following code:
Migration is easy and provides predictable costs, increased data privacy, and the ability to fine-tune models to fit your specific needs.
best practices
Consider the following best practices:
- File validation – Please check before uploading
model.safetensors.index.jsonIt has the correct metadata structure, referenced safe tensor files exist, and tokenizer support. Local validation saves import retry time. - safety – Automatically create an IAM role with least privilege permissions in the Amazon Bedrock console. For multiple models, use separate S3 prefixes to maintain separation.
- version control – Use a descriptive S3 path (
gpt-oss-20b-v1.0/), or a dated import job name to track the deployment.
Pricing
You incur charges when you perform inference using custom models that you import into Amazon Bedrock. For more information, see Calculating the Cost of Running a Custom Model and Amazon Bedrock Pricing.
conclusion
This post showed how to deploy a GPT-OSS model to Amazon Bedrock using custom model import while maintaining full OpenAI API compatibility. You can now migrate your existing applications to AWS with minimal code changes and gain enterprise benefits such as full model control, fine-tuning capabilities, predictable pricing, and increased data privacy.
Ready to get started? Here are your next steps.
- Please select model size – Start with the 20B model for faster responses or use the 120B variant for complex inference tasks
- Set up the environment – Make sure you have the necessary AWS permissions and access to your S3 bucket
- Try out the Amazon Bedrock console – Import your first GPT-OSS model using the Amazon Bedrock console
- Explore advanced features – Once you have the basic setup working, consider fine-tuning it using your own data.
Amazon Bedrock Custom Model Import is available in multiple regions, and support will expand to additional regions soon. For the latest updates, see Feature Support for Amazon Bedrock by AWS Region. The GPT-OSS model will initially be available in the US-East-1 (N. Virginia) region.
Have questions or feedback? Connect with our team through AWS re:Post for Amazon Bedrock. We’d love to hear about your experience.
About the author
 Prashant Patel is a senior software development engineer at AWS Bedrock. He is passionate about scaling large language models for enterprise applications. Before joining AWS, he worked at IBM producing large-scale AI/ML workloads on Kubernetes. Prashant holds a master’s degree from New York University’s Tandon School of Engineering. Outside of work, I enjoy traveling and playing with my dog.
 Ainesh Sousa I’m a software development engineer at AWS. He is passionate about performance optimization and scaling large language models for enterprise applications. Prior to joining AWS Bedrock, he worked on authentication systems for Amazon’s Just Walk Out Technology. Ainesh holds a bachelor’s degree in computer engineering from Purdue University. Outside of work, my hobbies include playing the guitar and reading books.
 Sandeep Akhuri is a seasoned product and go-to-market (GTM) leader with over 20 years of experience in product management, engineering, and go-to-market. Prior to his current role, he led product management building AI/ML products at leading technology companies such as Splunk, KX Systems, Hazelcast, and Software AG. He is passionate about driving real-world impact with agent AI, model customization, and generative AI.