Converting still photos to video required editing software, motion graphics skills, and a lot of patience. In 2026, one photo and one sentence will be all it takes. Upload your image, describe the motion you want, and our AI tool will generate a short video clip within a minute. No timelines, keyframes, or experience required.
This beginner’s guide will walk you step-by-step through the entire process, from choosing the right photo to creating prompts that actually work, and will also teach you how to solve the most common problems along the way.
| Short answer: To convert photos to videos using AI, select a sharp, high-resolution image, upload it to the AI image conversion tool, create a short prompt that describes the motion you want, set the clip to a few seconds, and generate and review. If the results are incorrect, adjust the prompts and generate again. Most tools create clips in less than a minute. |
content
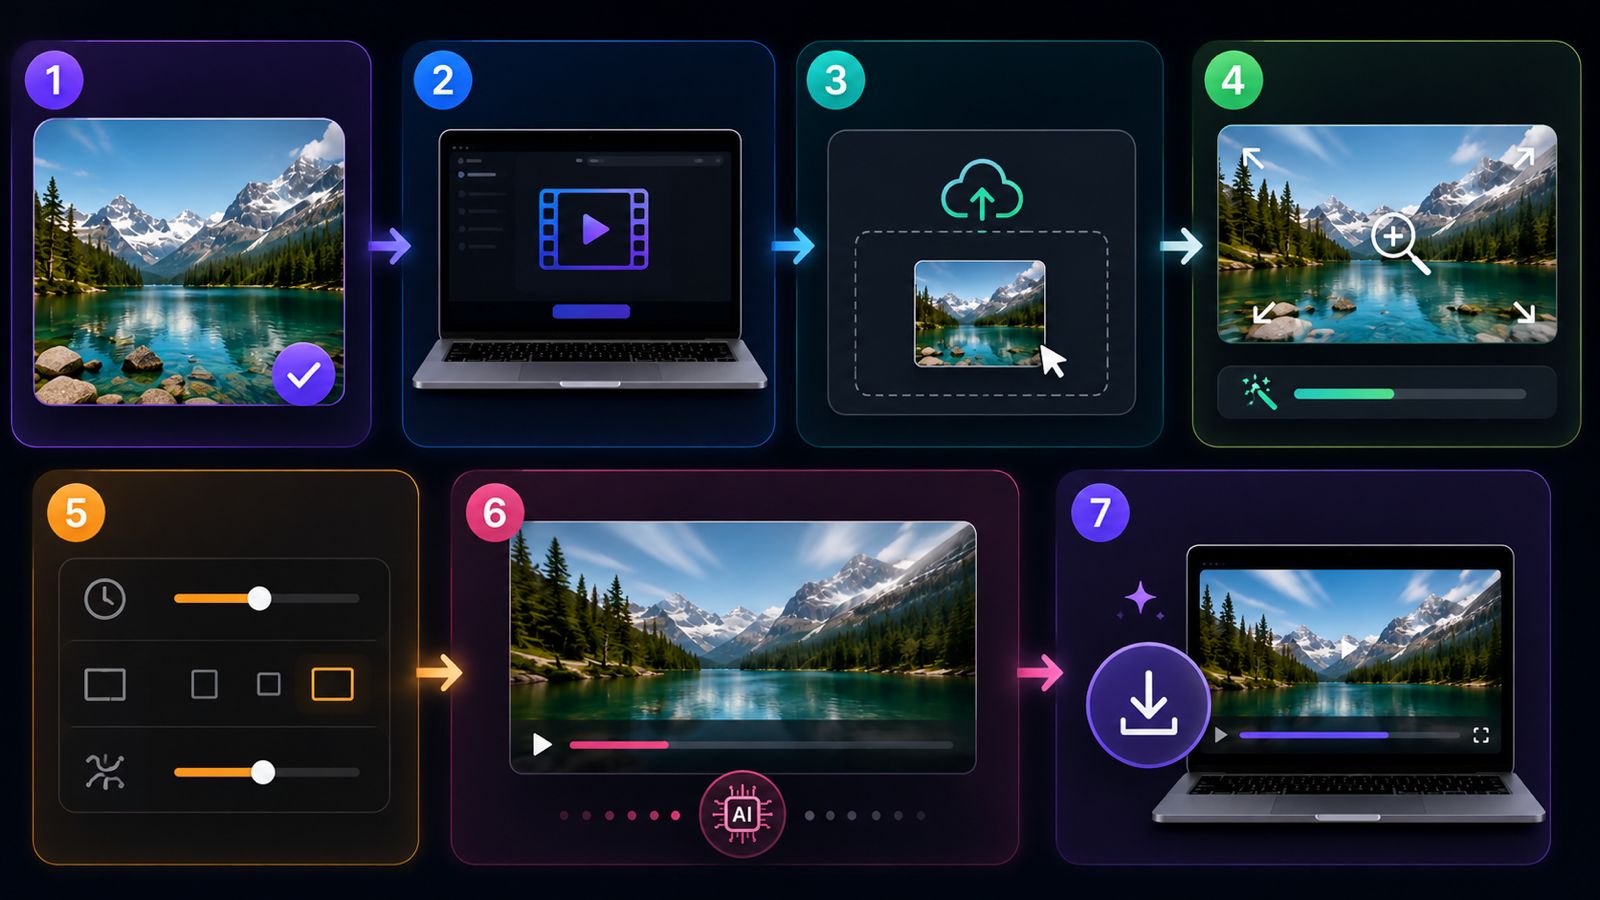
- What you need before you start
- Step 1: Choose the right photo
- Step 2: Choose an AI image conversion tool
- Step 3: Upload your photo
- Step 4: Create a clear motion prompt
- Step 5: Set length and format
- Step 6: Generate and review your clip
- Step 7: Adjust and download
- Tips for better results
- Common problems and their solutions
- Limitations to keep in mind
- FAQ
- conclusion
What you need before you start
All you need to get started is:
- Clear, high-resolution photos that you want to animate.
- AI image to video conversion tool. Many of them can be tried for free in your browser.
- A simple idea of the movement you want, such as a slow zoom or gentle background movement.
Step 1: Choose the right photo
The quality of the source image has the biggest impact on the results. Clear, bright, high-resolution photos provide AI with sharp details. Images become less effective when they become blurry, dark, or cluttered, causing them to wobble, distort, or move strangely.
On your first try, choose something simple.
- Good choice: Clear product shots, portraits, landscapes, or pretty illustrations.
- avoid: Photos with large blurs, very dark shadows, crowded backgrounds, or many small overlapping objects.
Step 2: Choose an AI image conversion tool
Next, select the tool to generate the video. For your first try, look for one that is easy to use, works in your browser, and offers a way to test it for free before paying. Some tools even have mobile apps, so you can create right from your phone.
For example, ImageToVideos.ai allows you to upload photos and generate short clips in seconds without any complicated setup, making it easy for beginners to use. The steps below work the same no matter which tool you choose.
Step 3: Upload your photo
Open the tool and upload your image. This usually involves dragging the image or clicking the upload button. Most tools accept common formats such as JPG, PNG, and WEBP. Once loaded, you’ll see your photo is ready as the first frame of your video.
Step 4: Create a clear motion prompt
This is the most important step. Prompts tell the AI how to move through images, and specific prompts are almost always better than vague prompts. Rather than “move” it, describe the exact movement, speed, and desired atmosphere.
Below are some examples of prompts for beginners.
- “Slow, cinematic zoom-ins, soft natural light, and subtle background movement.”
- “A gentle breeze blowing in your hair, a slight head turn, and realistic camera movement.”
- “Slow panning across the scene, clouds rolling by, quiet, steady movement.”
- “A soft push into the product, slight rotation, and clean studio lighting.”
Step 5: Set length and format
Set some basic options before generating. Shorter clips are more stable and look more realistic, so keep your first clip short, around 3 to 6 seconds. If the tool asks for an aspect ratio, choose the one that matches where you want your video to be used, such as vertical for Reels and Shorts or widescreen for YouTube. If you have a motion intensity setting, start low for a discreet and natural result.
Step 6: Generate and review your clip
Now generate the video and wait, usually anywhere from a few seconds to a minute. When you’re done, take a close look. Is the subject matter consistent? Is the movement natural? Are there any distortions, especially on the face, hands, or small areas? AI video is probabilistic, so the first result is not always the best.
Step 7: Adjust and download
If the clip is incorrect, adjust it and try again. If the subject changes too much, add instructions to maintain the original face, product, color, and composition. If the movements seem too strong or unnatural, ask for subtle or minimal movements. It is common to generate two or three versions and choose the best one. If there are no problems, download the clip. Please note that the free plan may add watermarks and limit resolution.
Tips for better results
- Start with the highest resolution photo you have. More detail means cleaner movement.
- Keep your clips short. 3-6 seconds seems much better than 10 seconds.
- Use simple movements like zooms and gentle winds first before trying more complex actions.
- Be specific in your prompts. Name the movement, speed, and lighting.
- Generate several versions. The second or third try is often the cleanest.
Common problems and their solutions
If your first clip doesn’t look right, you’re not doing anything wrong. Here are the most common beginner problems and easy solutions:
| problem | How to fix |
| The face or subject changes | Add “Do not change original face and details” to the prompt. |
| Moves too much or looks unstable | Ask for “subtle, slow, minimal motion” or lower your motion settings |
| The background is distorted or melted | Use simpler photos and shorter clips |
| Distortion of hands and small objects | Avoid close-ups of your hands or crop them before uploading. |
| Clips look blurry | Start with a high resolution image and check the output resolution |
Limitations to keep in mind
AI image to video conversion is good, but not perfect. Most tools only produce short clips, and complex motion such as fast action, walking, or crowded scenes can also introduce artifacts. Shorter clips look the most convincing, as longer videos tend to move away from the original image. Free tiers often add watermarks or cap resolution.
There are also ethical aspects worth remembering. These tools can animate photos of real people, so don’t animate identifiable people without their permission. AI-generated content should be clearly labeled if it can mislead your audience.
FAQ
Do I need any editing experience to turn photos into videos?
No, the latest AI image conversion tools handle the hard part. No timeline editing or animation skills are required, as all you need to do is upload a photo and describe the desired motion.
Is it free to turn photos into videos using AI?
Many tools offer free credits or free tiers, but limits vary. Free outputs may include watermarks, low resolution, or short clip lengths, but paid plans typically remove these limitations and add more features.
What kind of photos work best?
High-resolution photos that are crisp, clear, and bright are best. Product photos, portraits, landscapes, and clean illustrations typically perform better than dark, blurry, or cluttered images.
How long does it take to make a video?
Depending on the tools and settings, it usually takes only a few seconds to a minute per clip. Most of your time will be spent creating prompts and reviewing or regenerating the results.
Can I convert photos to videos on my phone?
yes. Many tools work in mobile browsers or offer apps so you can upload photos, create prompts, and generate clips directly from your phone.
Why does my AI video look distorted?
Distortion is usually caused by low-quality source images, clips that are too long, or motion that is too strong. Try prompts for clearer photos, shorter clips, and subtle, natural movement.
conclusion
Using AI to convert photos to videos has become truly beginner-friendly. Start with a clear image, choose simple tools, create specific prompts, and keep your first clip short. Remember to expect to produce several versions and use technology responsibly before grabbing your favorite version. With a little practice, you can bring almost any photo to life in less than a minute.


