AI-powered content generation is now built into everyday tools like Adobe and Canva, and many agencies and studios are incorporating this technology into their workflows. Image models can now consistently deliver photorealistic results, video models can now produce longer and more consistent clips, and both can now follow creative directions.
Creators are increasingly running these workflows locally on their PCs to gain direct control over assets, reduce the cost of cloud services, and eliminate the friction of repetition. This makes it easy to adjust the output at the pace your creative project demands.
NVIDIA RTX PCs have been the system of choice for running creative AI since their inception due to their high performance (faster iteration times) and the ability to run models for free, eliminating token anxiety.
With recent RTX optimizations and the new open-weight model introduced at CES earlier this month, creatives can now work faster, more efficiently, and with greater creative control.
How to get started
Getting started with visual generation AI can seem complicated and limiting. Online AI generators are easy to use, but have limited control.
Open source community tools like ComfyUI simplify setting up advanced creative workflows and are easy to install. We also provide an easy way to download the latest and greatest models like FLUX.2 and LTX-2, as well as top community workflows.
Here’s how to get started with visual generation AI locally on your RTX PC using ComfyUI and popular models.
- To download and install ComfyUI for Windows, visit comfy.org.
- Start ComfyUI.
- Create an initial image using a starter template.
-
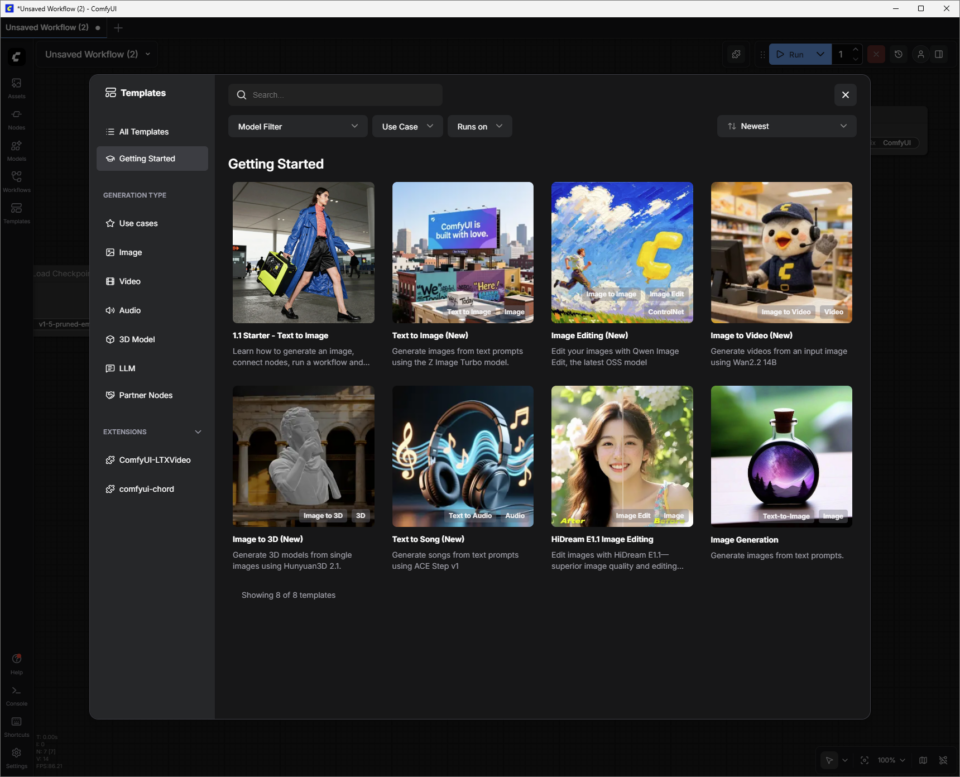
- Click the Templates button, click Get Started, and select 1.1 Starter – Convert Text to Images.
- Connect the model “node” to the “image storage node”. Nodes work in pipelines and use AI to generate content.
- Press the blue “Run” button and watch the green “node” highlight as your RTX-equipped PC generates the first image.
Change the prompt and run it again to dive deeper into the creative world of visual generation AI.
Read below to learn about additional ComfyUI templates that use more advanced image and video models.
Model size and GPU
As users become more familiar with ComfyUI and the models it supports, they should consider the amount of GPU VRAM and whether the model will fit within it. Depending on your GPU VRAM, here are some examples to get you started.

Image generation

To find out how to improve the quality of image generation using FLUX.2-Dev:
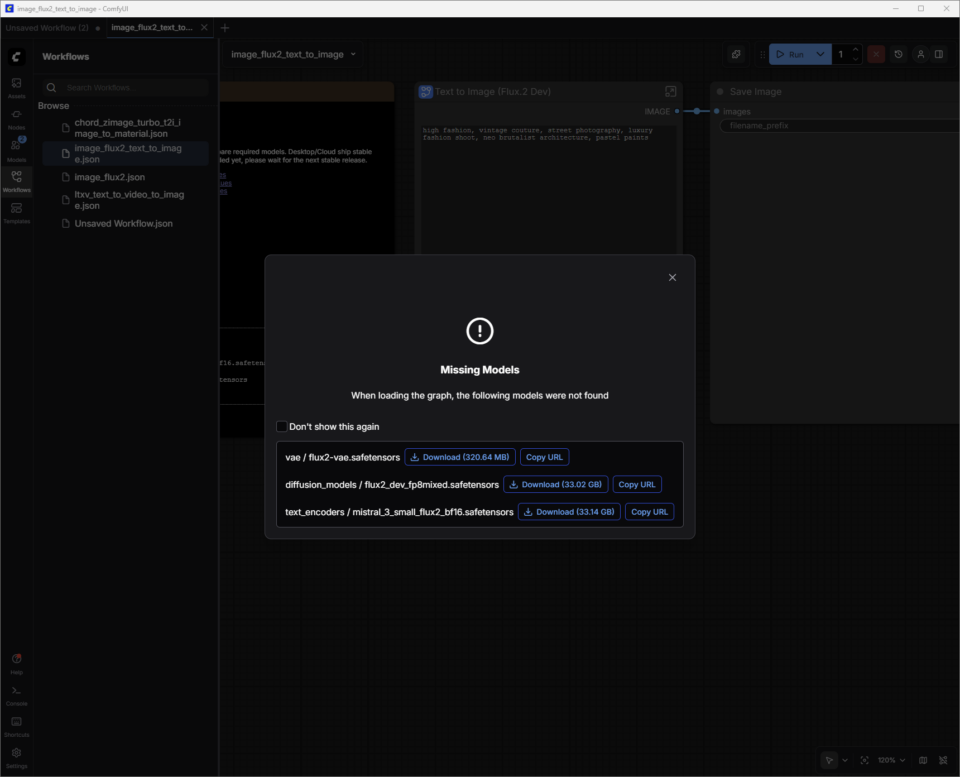
In the Templates section of ComfyUI, click All Templates and search for FLUX.2 Dev Text to Image. When you select it, ComfyUI loads a collection of connected nodes, or a “workflow.”
FLUX.2-Dev has model weights that you need to download.
Model weights are the “knowledge” within an AI model. Think of model weights like synapses in your brain. When an image generation model like FLUX.2 was trained, it learned patterns from millions of images. Those patterns are stored as billions of numbers called “weights.”
ComfyUI does not have these weights built-in. Instead, download weights on demand from repositories such as Hugging Face. These files are large (FLUX.2 can exceed 30 GB depending on the version), which is why the system requires sufficient storage and download time to retrieve the files.
A dialog will appear allowing the user to download the model weights. The weights file (filename.safetensors) is automatically saved to the correct ComfyUI folder on the user’s PC.
Save workflow:
Now that the model weights have been downloaded, the next step is to save this newly downloaded template as a “workflow”.
The user clicks on the hamburger menu (three lines) in the top left,[保存]Select. The workflow is saved to your Workflows list (press W to show or hide the window). Close tabs to end your workflow without losing your work.
If the download dialog is accidentally closed before the model weights have finished downloading:
- Pressing W immediately opens the Workflow window.
- Select a workflow and ComfyUI will load it. This will also prompt you to download the missing model weights.
- ComfyUI is now ready to generate images using FLUX.2-Dev.
Instant tips for FLUX.2-Dev:
- Start with a clear and specific description of the theme, setting, style, and atmosphere. For example, “cinematic close-ups of vintage race cars in the rain, neon reflecting off wet asphalt, and high-contrast 35mm photography.” Short-to-medium length prompts (one or two focused sentences) are usually easier to control than longer, story-like prompts, especially if you’re just starting out.
- Add constraints to guide consistency and quality. Specify something like:
- Framing (‘wide shot’ or ‘portrait’)
- Level of detail (“high detail, sharp focus”)
- realism (“photorealistic” or “stylized illustration”)
- If there are too many results, remove adjectives instead of adding them.
- Avoid negative prompts. Stick to prompting for what you need.
For more information about FLUX.2 prompts, check out this guide from Black Forest Labs.
Location on disk:
When you are finished adjusting the image, right-click Save Image Node to open the image in your browser or save it to a new location.
ComfyUI’s default output folders are typically the following based on the application type and OS:
- Windows (standalone/portable version): The folder is typically located at C:\ComfyUI\output or a similar path within the location where the program is unzipped.
- Windows (desktop applications): The path is typically in the AppData directory, such as C:\Users\%username%\AppData\Local\Programs\@comfyorgcomfyui-electron\resources\ComfyUI\output.
- Linux: The default installation location is ~/.config/ComfyUI.
prompt video
We will use the new LTX-2 model as an example to explore how to improve the quality of video generation.
Lightrick’s LTX‑2 is an advanced audio-video model designed for storyboard-style video generation that can be controlled with ComfyUI. Once you have downloaded the LTX‑2 image-to-video template and model weights, start treating the prompts like short shot descriptions rather than full movie scripts.
Unlike the first two templates, LTX-2 Image to Video combines images and text prompts to generate videos.
Users can take one of the images generated by FLUX.2-Dev and add text prompts to bring it to life.
Immediate tips for LTX‑2:
For best results with ComfyUI, write one flowing paragraph in the present tense, or use a simple script-style format that includes scene headings (sluglines), actions, character names, and dialogue. Aim for 4 to 6 descriptive sentences that cover all important aspects.
- Establish the shot and scene (wide/medium/close-up, lighting, color, texture, mood).
- Describe the action as a clear sequence, define characters with visible features and body language, and specify camera movements.
- Finally, add audio such as ambient sounds, music, or dialogue using quotes.
- Match detail level to shot scale. For example, close-ups require more accurate character and texture details than wide shots. Be clear about not only where the camera will go, but also how it will relate to your subject.
Additional details to consider adding to your prompt:
- Camera movement language: Specify directions such as Slow Dolly In, Handheld Tracking, Over-the-Shoulder Shot, Pan Laterally, Tilt Up, Push In, Pull Back, or Still Frame.
- Shot type: Specify wide, medium, or close-ups using thoughtful lighting, shallow depth of field, and natural movement.
- Pacing: It can be used directly for slow motion, time-lapse, reverberation shots, continuous shots, freeze frames, or seamless transitions that shape rhythm and tone.
- atmosphere: Add details like fog, mist, rain, golden hour light, reflections, and rich surface textures to base your scene.
- style: Specify the style early in the prompt: painterly, film noir, analog film, stop-motion, pixelated edges, fashion editorial, surreal, etc.
- lit: Direct backlighting, specific color palettes, soft rim lights, lens flares, or other lighting details with specific language.
- emotions: Focus on encouraging the performance of a single subject through clear facial expressions and small gestures.
- voice and audio: Encourage characters to speak and sing in different languages. This is supported by clear environmental sound descriptions.
Optimizing VRAM usage and image quality
As a Frontier model, the LTX-2 uses a large amount of video memory (VRAM) to provide high quality results. As the resolution, frame rate, length, or step increases, memory usage also increases.
ComfyUI and NVIDIA have teamed up to optimize a weight streaming feature that allows users to offload portions of their workflow to system memory when the GPU runs out of VRAM. However, this comes at the cost of performance.
Depending on the GPU and use case, users may want to limit these factors to ensure adequate generation time.
The LTX-2 is a very advanced model, but like any other model, tweaking the settings can have a big impact on quality.
To learn more about optimizing the use of LTX-2 with RTX GPUs, check out ComfyUI’s LTX-2 quick start guide.
Build a custom workflow using FLUX.2-Dev and LTX-2
FLUX.2-Dev allows users to move back and forth between ComfyUI workflows, simplify the process of generating images, locating them on disk, and adding them as image prompts to LTX-2 Image to Video workflows. This can be achieved by combining the model into a new workflow.
- Open the FLUX.2-Dev Text to Image workflow you saved.
- Hold down the Ctrl key and click the FLUX.2-Dev Text to Image node.
- Use Ctrl+V to paste nodes in the LTX-2 image-to-video workflow.
- Mouse over the IMAGE dot of the FLUX.2-Dev Text to Image node, left-click, and drag to the Resize Image/Mask Input dot. A blue connector will appear.
Save with a new name and create image and video text prompts in one workflow.
Advanced 3D generation
After generating images with FLUX.2 and video with LTX-2, the next step is to add 3D guidance. NVIDIA Blueprint for 3D Guided Generation AI shows how to use 3D scenes and assets to drive more controllable, production-style image and video pipelines on RTX PCs using ready-made workflows that users can inspect, adjust, and extend.
Creators can show off their work, connect with others, and find help in the Stable Diffusion subreddit and ComfyUI Discord.
#ICYMI — Latest advances in NVIDIA RTX AI PC
💻NVIDIA @ CES 2026
The CES announcement included 4K AI video generation acceleration on PC with LTX-2 and ComfyUI upgrade. Additionally, key RTX acceleration across ComfyUI, LTX-2, Llama.cpp, Ollama, Hyperlink, and more enables video, image, and text generation use cases on AI PCs.
📝 Black Forest Labs FLUX 2 Variant
Flux.2 [klein] is a compact and super-fast set of models that supports both image generation and editing and provides cutting-edge image quality. These models are accelerated by NVFP4 and NVFP8, delivering up to 2.5x speed improvements and enabling performance with a wide range of RTX GPUs.
✨Project G assist update
A new “reasoning mode” enabled by default gives Project G-Assist increased accuracy and intelligence, and the ability to execute multiple commands at the same time. G-Assist now allows you to control settings for G-SYNC monitors, CORSAIR peripherals, and CORSAIR PC components via iCUE, covering lighting, profiles, performance, and cooling.
Support for Elgato Stream Decks is also coming soon, bringing G-Assist closer to a unified AI interface for coordination and control of almost any system. For G-Assist plugin developers, the new Cursor-based plugin builder accelerates development using Cursor’s agent coding environment.
Plug into your NVIDIA AI PC. facebook, Instagram, TikTok and × — Subscribe to stay up to date RTX AI PC Newsletter.
Follow NVIDIA Workstation linkedin and ×.
look news About software product information.