Our methodology combines GenAI-driven hypothesis generation with deterministic network modeling and iterative refinement. First, we utilize previous analyses (e.g., DEG or ML-based feature selection) and prompt GenAI to identify additional candidate genes and interactions, thereby expanding a small set of interesting genes into a broader pool of regulators and target genes. Second, we convert the GenAI output into a signed interaction network by querying gene pairs individually, encoding the results in a weighted adjacency matrix, and removing redundant indirect edges. Third, we translate this network into an ODE-based model within the Data2Dynamics framework, fit the parameters to time-resolved experimental data, and use regularization to obtain an interpretable network. An iterative feedback loop follows this. Genes with poor fit are identified (Chi-2), GenAI is prompted again to suggest upstream regulators specifically for these nodes that do not fit well, and the expanded network is refitted. This process continues until a stable, data-consistent GRN is obtained. In the following sections, we describe each of these steps in detail, from GenAI-assisted network generation through ODE-based model fitting to the refinement by the feedback loop (see Fig. 5 for a schematic overview).

Overview of all steps of model generation via DataXflowGen. All steps are clearly outlined in the “Methods” section. All scripts and important files can be found here https://github.com/Sunbio1/DataXflowGen. Created in BioRender. Crouch, S. (2026) https://BioRender.com/908fj5z.
The git repository contains all scripts and files and can be found here: https://github.com/Sunbio1/DataXflowGen.
Data collection
Datasets may provide diverse information generated through various methods. On one side, significantly differentially expressed genes (DEGs) can serve as a basis for model development. Machine learning algorithms that identify significant distinctions between, for instance, young and elderly or sick and healthy persons are also predicated on genes and can be used for model development32,33,34,108. We chose an established dataset from senescence research here. This data originated with fibroblast cells exposed to Ethylene Oxide (ETO) treatment. A scRNA-seq analysis was conducted for seven distinct time points. We adopted the count tables from their analysis for our investigation31.
Data preparation
Seven datasets were extracted from ‘.h5ad’ files (GSM7068361, GSM7068362, GSM7068363, GSM7068364, GSM7068365, GSM7068366, and GSM7068354) and filtered to retain cells with a minimum of 200 identified genes and genes expressed in at least 3 cells. Quality control measures were calculated and presented, including total count, detected gene quantity, and the ratios of mitochondrial (MT) and ribosomal (RPS/RPL) counts. The counts were normalized to a total library size of 30,000 counts per cell (normalize_total), and the normalized expression matrix was exported as a CSV file (‘1_step_filtering.py’). Filtering out rows with only zeros was performed (‘2_cleaning_zero.py’) and served as ‘GSMxxx_count_cleaned.csv’.
Data-specific normalization
Data from each time point was taken from the cleaned count tables and limited to the genes specified in either ‘gene_list.csv’ or ‘loop_gene_list.csv’. The expression values were converted to a numeric format, and non-finite entries (NaN/ ± Inf) were removed. Negative values were excluded, but zeros were retained. Based on the data, it is important to evaluate whether zeros need to be filtered out. Too many zeros in scRNA data can cause problems during specific normalization (see also the Discussion on data issues ‘Data limitations and challenges for gene regulatory networks’). The values were subjected to a log transformation using log(1 + x) = log1p(x). The maximum log-transformed value was calculated for each gene and time point, and all log-transformed data were normalized per gene over all points in time by this maximum. This resulted in values within the range [0, 1]. The mean of the normalized results was determined for each gene and time point. The effective standard error was reported as SEeff = SD/√(Neff). For our dataset, we used an effective sample size of Neff = 15 to obtain conservative uncertainty estimates (i.e., larger effective error bars / standard errors). This choice reflects that individual cells from the same single-cell experiment are not independent biological replicates and that cell-to-cell variability within one sample does not capture the full uncertainty across experiments or populations. The specific value Neff = 15 was selected empirically because it resulted in error bars of an acceptable magnitude while avoiding the unrealistically small standard errors that occur when all cells are treated as independent replicates. The resulting summary table for each time point (mean and SEeff per gene) is saved as ‘neu_data_log_15neff.csv’. The script ‘neff_norm.py’ can be found in the ‘normalization’ folder here https://github.com/Sunbio1/DataXflowGen.
Model generation pipeline
We have developed an iterative workflow that combines GenAI-based knowledge extraction with deterministic network construction and model refinement. Starting with an initial list of genes, GenAI is first used to expand the set of candidate genes to include additional, functionally related genes. Subsequently, GenAI is queried in a controlled, pairwise manner to assign signed interaction types (activation or inhibition, direct or indirect) between selected gene pairs, which are encoded in a weighted adjacency matrix. This interaction graph is then translated into a mechanistic model within the D2D framework, where model parameters are fitted to time-resolved experimental data and regularized to obtain well-identified network structures. Based on goodness-of-fit evaluations, poorly fitted genes and sensitive parameters are identified and used to define targeted feedback loops. GenAI is then queried again to suggest plausible upstream regulators, the interaction network and adjacency matrix are expanded, and the cycle of fitting and evaluation is repeated until a stable, data-consistent network is obtained. Figure 5 provides a general overview of this methodology and its implementation, mapping each conceptual step of the pipeline to the corresponding analysis scripts used for data preprocessing, the GenAI-based query, model construction, parameter estimation, and iterative network refinement. The individual steps and the scripts used are explained in detail below.
Initial model generation pipeline
The goal of this first phase is to compile a biologically plausible set of genes and potential interactions that will later form the backbone of the GRN. We use GenAI to expand an initial list of genes of interest to include additional, context-specific regulators and interaction partners based on literature references and previous analyses before translating these suggestions into a structured network representation.
GenAI response to find possible new interaction genes
In this first step, GenAI acts as a knowledge-based assistant that suggests additional genes likely to interact with an initial set of genes of interest within a specific biological context (e.g., tissue, phenotype, treatment).
In our pipeline, a prompt (1_prompt.py, Fig. S6 in Supplementary Material (sup)) was run via API access to PerplexityAI29 to create a gene list of possible interaction partners by using genes of interest identified through previous analyses, like DEG analysis or ML approaches. Such ML approaches can be used to identify genes with high predictive power for separating phenotypes based on expression values32,33,34,108. In a prompt, we can provide context that the following genes have been analyzed to have a high predictive power and we would like to have the most relevant ones from them to build a causal regulatory network to model the differences between the corresponding phenotypes as well as let the AI assistant add more nodes in case we would also like to model genes that interact with drugs and integrate their impact into the network.
Besides the list of important genes from a data analysis, we provide further context in a prompt from which tissue the cells are taken and for what purpose we would like to use the model for. Below, we provide the used prompt (Figs. S6, S7, and S8 in sup). In our case, we used CDKN1A as a starting point, an important gene for studying senescence31. The ‘sonar’ LLM model was used via API, which is supported by PerplexityAI29. The API query was performed using Python (version 3.13.1) and the package openai (version 1.59.5). To get a deterministic output, the temperature was adjusted to 0, and to confine the generative AI response to highly probable solutions, top_p was set to 0. These settings are implemented for each API request. API response was saved to ‘api_response.csv’ (https://github.com/Sunbio1/DataXflowGen).
To generate a larger model directly based only on the genes of interest, the first prompt for a one-shot model (Fig. S8; sup) can be used. The difference from the initial model generation pipeline is the starting prompt (Fig. S6, sup). In our case, we used the genes (ATM, CDK2, CDK4, CDKN1A, MAPK14, MTOR, NR1H4, PCNA, RB1, SPI1, TP53, and ZFP36L1) from the result of the last step of the original model (Fig. 3). The subsequent steps from the initial model pipeline are simply executed after the prompt (Fig. S7). If genes are to be added to the list, you can simply use the original pipeline and specify the number of genes to be added.
It is possible to change the prompt to obtain the best result for different analyses, e.g., for a cancer model.
New gene list and list of gene pairs
Next, we convert the GenAI output into a format that can be systematically queried for interactions. To do this, we clean up the gene list, standardize the gene names, and generate all relevant gene pairs so that every possible regulator-target combination can be analyzed in a structured and reproducible manner.
This output was then processed (‘1_prompt.py’ (available here https://github.com/Sunbio1/DataXflowGen); python (version 3.13.1)). This included filtering out the gene list from the response and standardizing gene names, when necessary, e.g., TGF-ß to TGFb can be replaced by ‘str.replace()’ method in Python (can be extended in script: 1_prompt.py). The gene list served to generate gene pairings to analyze the interaction between all the genes and construct the interaction network. This list of gene pairs is structured as gene1, gene2; gene2, gene1; gene1, gene1; and gene2, gene2. In this context, gene1 influences gene2, and so on. Output file ‘extended_gene_pairs.csv’ can be found here (https://github.com/Sunbio1/DataXflowGen). These pairs may subsequently be used in the iterative single interaction question prompt. This single query is intended to reduce the hallucinations of GenAI. The newly generated gene list will be used to normalize the scRNA data for DataXflowGen and can be found above in the “Methods” section under Data-specific normalization.
GenAI response for gene interaction
In this step, we convert GenAI’s text-based knowledge into a machine-readable description of which gene regulates which in the network and with what sign. By querying GenAI for one gene pair at a time and forcing it to select a single interaction type (activation, inhibition, indirect interaction, or no interaction), we reduce hallucinations and obtain a clean, standardized interaction table that can be used for subsequent modeling.
For this, an iterative loop was executed to query the interactions for each gene pair via GenAI to overcome hallucinations. Analyses were implemented in Python 3.13.1 using the standard library (including itertools) (‘1_2_prompt.py’).
The output of the interactions per gene pair was defined in the prompt (Fig. S8) as follows. Direct activation should be indicated with 1 or direct inhibition with − 1. In addition, indirect connections were also queried, which were to be defined as 2 for indirect activation or − 2 for indirect inhibition. Indirect interactions are interactions between genes where genes that convey the interaction are not present in the model, but via such genes, there is an interaction between the corresponding genes. When no information was available, this should be noted as 0. Therefore, information on the interactions of each gene pair can be displayed using these classifications. Based on the highest probability, the GenAI was only permitted to provide one response per gene pair. The output was filtered (Python version 3.13.1) and named ‘cleaned_gene_interactions.csv’ (available here https://github.com/Sunbio1/DataXflowGen).
Generation of an adjacency matrix
We then convert the list of pairwise interactions into a mathematical object that can be processed using graph- and ODE-based modeling tools. The resulting weighted adjacency matrix records, for each ordered gene pair, whether a regulatory connection exists and its sign, provides a compact representation of the network structure.
This weighted adjacency matrix was generated based on the GenAI response (‘2_ad_matrix.py’). In the matrix A, each gene (node) is mapped to an index (node_to_index), and an N × N matrix is initialized with zeros. For each interaction, the indices u and v are derived from Gene1 and Gene2, respectively, and the interaction value is recorded as the edge weight at A[u,v]. This results in a directed graph as only the edge Gene1 → Gene2 is represented, while non-existent edges stay zero. The matrix data is sourced from the file ‘cleaned_gene_interactions.csv’ and has exactly three columns: gene1, gene2, and interaction. The gene names are collected and arranged in alphabetical order, from which a node list is constructed to form the adjacency matrix A (‘adjacency_matrix.csv’).
Updated adjacency matrix
To avoid redundant and unnecessarily complex models, we simplify the adjacency matrix by removing indirect edges that are already accounted for by paths of direct interactions. This pruning step can reduce the number of free parameters in the resulting ODE model, while preserving the network’s essential causal structure.
To this end, the extended adjacency matrix (extended_adjacency_matrix.csv) was processed to eliminate redundant indirect connections (4_update_matrix.py). This is optional, but it can reduce free parameters in the model since regulation via indirect interaction is canceled if a corresponding path of direct interactions exists. Two redundancy rules were implemented:
-
1.
Positive redundancy: Any indirect activation (weight = 2) from gene i → j was removed if j was reachable from i through a path consisting solely of direct activations (edges with weight = 1).
-
2.
Negative redundancy: Any indirect inhibition (weight = − 2) from gene i → j was removed if j was reachable from i exclusively via direct inhibitory edges (weight = − 1).
The existence of paths was checked using breadth-first search in the graph filtered by the corresponding edge. Updates were implemented solely when the redundancy criteria were satisfied. The cleaned matrix was then exported (4_update_matrix.py) both in the original CSV layout, including headers (modified_adjacency_matrix.csv), and as a pure numerical matrix (updated_adjacency_matrix.csv).
Topology: create file for yED
For visualization and manual review, we export the final network into a format that can be opened directly in the yED Graph Editor. This step converts the adjacency matrix into a human-readable network diagram, in which nodes represent genes and edges indicate activating or inhibitory interactions.
In this step, the final adjacency matrix (modified_adjacency_matrix.csv) was converted so that it can be read by the yED software. This involved converting the matrix into an edge list containing only non-zero entries as triplets (Gene1, interaction, Gene2). The interaction signs were then converted to sign notation: “+” for 1/2 (activation) and “−” for − 1/ − 2 (inhibition) (‘yED.py’).
At the same time, a sorted list of unique genes representing the union of Gene1 and Gene2 was created. The output table was structured so that the interaction triplets occupied the first three columns, followed by an empty column and a fifth column listing all the unique genes. The table was padded to align both lists by row, then exported without headers as ‘topo.xlsx’ (’yED.py’).
This file can be opened with yED software (https://www.yworks.com/) and converted to a readable Graph Markup Language file (‘graphml.file’). Briefly described in Crouch et al.23.
Model fitting by D2D
In this step, we verify whether the proposed GRN can indeed explain the experimental data. To this end, the network is converted into a system of differential equations, and the parameters are estimated so that the simulated gene expression dynamics match the measured values as closely as possible. Concurrently, Data2Dynamics (D2D) maintains the model as simple and robust as possible. We then systematically examine which regulatory interactions are actually necessary and which can be removed without compromising the model’s explanatory power. To accomplish this objective, we implement L1 regularization to reduce the influence of non-sensitive parameters to zero and utilize an automated intervention analysis, termed ‘Lever’ (suggestions for additional starting points in the model), to investigate the impact of alterations in individual parameters on specific genes. This approach facilitates the identification of the most influential levers within the network.
For this, the interaction network (‘new_model.def’) is transferred to model equations so that the corresponding model can be fitted to the experimental data (‘new_data.def’ and ‘new_data.csv’) via the D2D framework23,30 (Fig. 5) and used to test whether the interaction network cannot be rejected given the data. After compilation, the parameter limits were cleaned up before optimization to avoid implausible parameter deviations (e.g., by restricting h_* to [1,10], b_6_2 to [0,5], and limiting the upper bounds of a_* to ≤ 50 while enforcing valid boundary intervals included as sanity bounds before fit starts (‘setup.m’). An initial fit was conducted and saved in PEtab format (‘export_full’). Furthermore, for each gene per time point, Chi-2 values have been stored in CSV format by using experimental data as the expected outcome and the corresponding values of the variables of the model (observables) as the observed outcome, normalized by their respective experimental (expected) standard error (‘chi2_full.csv’).
L1 regularization was used as a sensitivity test for the stability/redundancy check. After compilation, the parameter limits were cleaned up before optimization to avoid implausible parameter deviations (e.g., by restricting h_* to [1,10], b_6_2 to [0,5], and limiting the upper bounds of a_* to ≤ 50 while enforcing valid boundary intervals).
Subsequently, using qL1reg, an L1 penalty of 50 was applied to the subset of interaction parameters with the prefixes a_, b_, h_, delta_. The purpose of this regularization was to identify parameters with little influence and to reduce model complexity. Parameters classified as negligible by L1 fitting were removed from the set of free parameters during the subsequent optimization (qFit = 0), thereby simplifying the model structure. The reduced model was then refitted without L1 regularization, using the L1 solution as an initial estimate to obtain unbiased goodness-of-fit and model selection metrics. These were summarized by Chi-2, degrees of freedom (ndata − k, where k represents the number of fitted parameters), and information criteria (AIC and BIC), which were calculated from Chi-2 and k. Parameters with an absolute value below a predefined threshold (|p|< 10) were set to their L1-estimated values rather than being explicitly set to zero. Accordingly, the L1 method served primarily to identify the parameters with the greatest influence on the model. The reduced fit was exported in PEtab format, and the retained interactions were saved in CSV. In summary, after the L1-regularized fit, any parameters with absolute values below the predefined threshold (|p|< 10) are fixed and removed from the set of free parameters. The model is then refitted without regularization using the reduced parameter set. If the Chi-2 value obtained from the (unreduced) fit (‘chi2_full.csv’) and the Chi-2 value obtained after refitting (‘chi2_reduced.csv’) of the reduced model are essentially identical, the fixed parameters are considered redundant, and the fit is considered stable in terms of parameter reduction.
Next, we performed an automated intervention analysis, which we refer to as ‘Lever’ (implemented in ‘setup_all.m’), to systematically identify influential model parameters (‘levers’) whose perturbation most improves the fit of selected target genes. It provides an overview of whether each gene needs to be upregulated or downregulated in the model to improve the fit. The gene regulation file (all_genes_with_regulation.csv) explicitly defined the target nodes (genes) and the desired direction of change (up- or downregulation). For each such target with a high contribution to the overall Chi‑2, the model candidate parameters associated with that target were systematically adjusted (rather than the gene expression values themselves; increased or decreased by specific factors), and the model was re-simulated. The parameters were then evaluated based on the resulting change in the target response (e.g., change in peak value and/or area under the curve) and on how much they reduced the Chi‑2 contribution of these poorly fitted genes, thereby creating a prioritized list of lever parameters. We always focus on the genes with the highest Chi-2 values, as these are the points where the model explains the data the least well. By improving the fit for these genes, we reduce most of the discrepancy between the model and the experimental data. The results are stored in a timestamped diagnostic folder.
Model fitting was performed on a Linux x86_64 server (kernel 6.10.5–1-default) in MATLAB R2023a (9.14.0.2206163) using ‘lsqnonlin’ (Optimization Toolbox v9.5), and automated intervention analysis (‘Lever’) was carried out with custom MATLAB utilities (e.g., ‘auto_from_csv’, ‘auto_find_levers’) integrated into the D2D workflow.
Visualization
To make the fit of the model immediately apparent, we visualize how well the model fits the expression time curves of the individual genes. These diagnostic plots compare experimental data with simulations side by side, highlighting where the model fits well and where it deviates, which helps us identify parts of the network that may need to be refined.
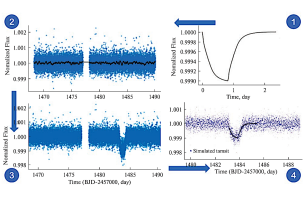
For this purpose, a Python post-processing script (’matlab_plots.py’) was employed to visualize the final Chi-2 output (‘chi2_final.csv’, ‘chi2_full.csv’) and to compare the experimental data with the fitted model simulations. The CSV file was imported, and all distinct observation variables were presented in a multi-panel format (three columns; the number of rows dictated by the quantity of observation variables). For each observational variable, the experimental data were represented as points with error bars (± 1 effective standard error, Std) at their respective time points (Time), while the associated model predictions (SimulatedData) were plotted as a continuous curve. The total Chi-2 contribution of each observation variable (the sum of Chi-2 across all time points) was presented in the title of the sub-diagram (e.g., “χ2 …”). The corresponding Chi-2 value represents a measure of the goodness of fit of the corresponding gene and can be used as a pointer where the model fits the data worst and therefore needs improvements most. The axis formatting was constant throughout all panels, including a fixed x-range, specified tick spacing, consistent font size, y-ticks ranging from 0 to 1 in intervals of 0.1, and grid lines. The figures were exported in PDF and high-resolution raster formats (PNG/JPEG/TIFF; 600 dpi) for publication-quality reports.
Back-loop preparation
In the back-loop phase, we prepare the model for a targeted feedback loop with GenAI by specifically identifying the points where the current network cannot reproduce the data. We quantify the deviation for each gene, identify which genes are explained the least well, and use this to determine whether they should be more strongly activated or inhibited in the model. This information then serves as structured input for the subsequent GenAI-guided expansion of the network.
Data processing and Chi-2 evaluation
In the next steps, we establish a robust feedback loop between the data and the model. First, we quantify how well each gene is currently fitted so that we can focus the subsequent GenAI-guided refinements precisely on the parts of the network that explain the data least effectively.
To do this, the downstream evaluation of model performance (the file ‘chi2_full.csv’ (normal fit results) or ‘chi2_reduced.csv’ (fit results after model reduction)) is processed using ‘1_high_chi2_gen.py’. The misfit per variable (gene) was calculated by aggregating all entries for each variable name and summing the associated Chi-2 contributions across all time points. To maintain uniformity in nomenclature across all data sources, the suffix ‘_obs’ was eliminated from all variable names.
The table containing the total Chi-2 values for each variable was exported as ‘chi2_sums_per_variable_full.csv’. The variable exhibiting the biggest difference between simulation and experiment was identified by sorting the Chi-2 table in descending order, extracting the variable with the highest total Chi-2 value, and saving it as ‘full_gene_with_highest_chi2.csv’. The rationale behind this sorting is that we need to improve the model with the highest Chi-2 values because Chi-2 values are a measure of misfit, and genes with the highest Chi-2 contribute most to the discrepancy.
A filtered table was created from either ‘chi2_full.csv’ or ‘chi2_reduced.csv’, which only contains variable names, experimental values (ExpData), simulated values (SimulatedData; model output of the corresponding gene), and data index (DataIndex). The suffix ‘_obs’ was removed from the variable names, and the resulting dataset was exported as ‘f_filtered_data.csv’ to enable a direct comparison between experimental measurements and simulated outcomes.
Post-processing and regulation assignment
Next, we determine in which direction the model needs to be adjusted for the gene with the poorest fit. By comparing the simulated and experimental values, we conclude whether this gene should be more strongly activated or inhibited in the model to improve the fit and encode this as a simple regulatory label (activation or inhibition) for the next GenAI step.
To determine whether the gene with the highest Chi-2 value needs to be more strongly activated or inhibited to improve the agreement between the model and experimental data, we applied the post-processing script ‘2_activation_inhibition.py’. The filtered simulation-experiment table (‘f_filtered_data.csv’) and the file containing the variable with the highest Chi-2 value (‘full_gene_with_highest_chi2.csv’) were imported into this script. It then identifies the corresponding gene and extracts all matching entries from the main dataset. The script then calculates the mean of the simulated and experimental values for this gene and determines their ratio. If the simulated values exceed the experimental values (ratio > 1), the deviation is interpreted as an overestimation, indicating inhibitory regulation. Conversely, the deviation is interpreted as an underestimation if the simulated values are lower than the experimental values (ratio ≤ 1), which corresponds to activating regulation. The derived regulation type is finally appended to the gene-specific output file.
The variable name associated with the highest Chi-2 value (in total) was obtained from the initial row of ‘full_gene_with_highest_chi2.csv’. Here, the gene-specific Chi-2 values were calculated as the sum of the Chi-2 contributions across all time points for each gene. The corresponding time-resolved experimental and simulated values for this variable were taken from the file ‘f_filtered_data.csv’. The ratios of the simulated values (SimulatedData) and the experimental values (ExpData) were obtained for this variable. The ratio of the simulated mean to the experimental mean indicated the simulation bias.
Variables with ratios beyond one (indicating simulation values are bigger than experiment values on average) are referred to as inhibition, whereas ratios less than or equal to one were classified as activation. A new column (Regulation) for the assigned regulation category was incorporated into the table of top variables, which was then exported as ‘gene_with_regulation.csv’.
Iterative back-loop via GenAI
These steps close the loop between the data, GenAI, and the network model. Starting with the gene that has the poorest fit and the required direction of change, we use GenAI to propose new upstream regulators, integrate them into the network, and re-evaluate the model, thereby expanding the network in a targeted, data-driven way.
Candidate target identification
In this step, we use the current model fit to decide which gene to improve next and in which direction. We select the gene with the highest misfit value (largest Chi-2 value) and the corresponding regulation (activation or inhibition) and treat it as the target for refinement. This provides a targeted starting point for the subsequent GenAI query, which then searches for plausible upstream regulators of precisely this gene to improve its fit.
For this, we integrate a new gene (node) into the network, as it could significantly influence the system dynamics (‘1_back_loop.py’). For this purpose, the candidate target gene with the highest Chi-2 value and the required interaction regulation (activation or inhibition) was loaded from ‘gene_with_regulation.csv’. Additionally, the existing genes from the network were loaded from ‘loop_gene_list.csv’. This ensures that these genes are not included in the GenAI query again in order to obtain new genes for model development. To propose an upstream regulator for this target, the regulatory direction (activation or inhibition) was first determined using the post-processing script ‘2_activation_inhibition.py’. This information was then incorporated into a constrained prompt (Fig. S9, Supplementary Material), which was queried deterministically (temperature = 0, top_p = 0) to enforce a strict upstream causal relationship (‘2_activation_inhibition.py’). This excluded downstream targets, co-factors, and non-causal interactors, prioritizing regulators prevalent in fibroblast senescence models that can typically be detected in bulk or single-cell RNA-seq datasets. Regulators that were already present in the current network were excluded (‘loop_gene_list.csv’). The prompt instructed the model to output either one HGNC gene symbol or ‘EMPTY’ if no suitable candidate met all the criteria from the literature and database research. The GenAI response was saved as ‘back_loop_api_response-csv’. Problems can arise if the regulatory genes suggested by the AI have only a very minor influence on the target node. In such cases, one can specifically ask the AI to identify, for example, five candidate genes that are expected to regulate the respective node. Subsequently, the normalized file or table can be used to assess how strong the expected regulatory contribution of these genes is. Determining which of these candidates are ultimately included as nodes in the model typically requires additional expert knowledge and a manual comparison with the biological context. Another option is to directly provide the GenAI with a count list, DEG list, or similar input data so that it can identify suitable genes based on this information. This approach can facilitate the selection of biologically relevant candidates but typically requires a large number of queries and thus higher token consumption, which in turn entails correspondingly higher costs. It should be noted that only genes that were also present in the dataset were used to expand our model. It is also possible to use a prompt (Fig. S10; sup) that is not as strict as the one in Fig. S9 in the supplementary. This allows genes to be identified when the strict model only outputs EMPTY because the information is not yet sufficient. It is also possible to include other factors, e.g., not only in fibroblasts, or also from the oncolytic field, as the available information on gene interactions in these areas is usually more extensive. The normalization step (see methods: Data-specific normalization) was used to check whether the gene was present in the dataset. It is important to note that if the gene was not present in the dataset, the name assigned by GenAI may be a synonym. This was verified using the ‘GeneCards’ database109, a database of human genes, and the name was replaced if necessary. It is also possible to make the entire DEG list available to GenAI and use it to identify a suitable gene, but this can be costly. If none of the genes suggested by GenAI are present in the dataset, the model structure offers another option (‘subgraph.py’; ‘upstream_root_cause.py’). Based on it, regulators already anchored in the network can be identified that could potentially exert a stronger influence if a new regulatory node is made available to them. Furthermore, the model allows for the inclusion of hypothetical nodes (genes) for which no experimental data are available. Such nodes can be incorporated into the model as constant nodes, thereby representing their presence and regulatory influence without requiring explicit time-series measurements. This strategy can also be used to preliminarily assess the potential effects of such a hypothetical node on the network. Furthermore, it may reveal that a regulatory interaction not yet described is required in this part of the network, which could prompt further experimental or literature-based investigations.
Gene-pairs generation for back loop
We then integrate the new regulator into the existing network by identifying all relevant gene pairs that should be examined for interactions. This ensures that every possible connection between the new gene and the existing network is systematically evaluated, rather than simply being added on an ad hoc basis.
To do this, the upstream regulator was imported from the file ‘back_loop_api_response.csv’ (‘2_create_genepairs.py’). Formatting artifacts from the code block, such as triple backticks and optional language tags, as well as empty lines, were removed to yield a single valid HGNC symbol. The network gene list was loaded from ‘loop_gene_list.csv’, and directed gene pairs were formed between the predicted regulator (gene that is supposed to improve the model fit by its regulation) and each network gene. For each combination, both orientations (regulator → gene and gene → regulator) were generated, excluding self-pairs, to embed the new gene into the existing regulatory network. Finally, the self-interaction (regulator → regulator) was added. All resulting pairs were compiled into ‘gene_pairs.csv’ with columns GeneA and GeneB. Next, we need to check if the added gene improves the model fit.
LLM-based GenAI interaction for searching for target genes
As before, we query GenAI in pairs to determine which of these potential connections are supported by the literature and what their sign is (activation, inhibition, or no interaction). This step converts the potential connections of the new regulator into a machine-readable set of interactions that can be merged with the existing network and validated against the data.
For this purpose, all directed gene pairs for the added gene from gene_pairs.csv were queried individually using deterministic model inference (model = ‘Sonar’, temperature = 0, top_p = 0). For each pair (gene1, gene2), the model was instructed to return a single integer encoding the direction and type of influence related to fibroblast senescence. The following notation should be used: − 1 = direct inhibition, − 2 = indirect inhibition, 1 = direct activation, 2 = indirect activation, 0 = no known interaction or insufficient evidence. The prompt required evidence from multiple peer-reviewed publications and prohibited speculative associations. If there was no repeated literature support, the model was restricted to return 0. The output was saved in ‘gene_interactions.csv’. The interaction values from previous runs are left unchanged.
In a further cleaning step, the “Interaction” field was analyzed using regular expressions to obtain the first signed integer. Before the analysis, all Markdown formatting, brackets, and line breaks were removed. The file ‘cleaned_gene_interactions.csv’ was created from the standardized results (‘3_back_loop2.py’).
Adjacency-matrix extension
We then merge the newly derived interactions with the existing network and update the adjacency matrix so that the expanded model can be simulated and analyzed in the same way as before.
For this purpose, the base adjacency matrix (‘loop_modified_adjacency_matrix.csv’), with the gene symbols serving as the row and column indices, and the cleaned interaction table (‘cleaned_gene_interactions.csv’) were loaded. All genes appearing in either the Gene1 or Gene2 fields were combined with the genes in the matrix of the previous regulatory network (baseline) to create a unified, sorted list.
To create a unified adjacency matrix, a new square matrix was initialized with zeros. Entries from the baseline matrix were copied, and each new interaction was inserted by assigning the specified interaction value to the corresponding position (Gene1 or Gene2). The extended matrix was written to the file ‘extended_adjacency_matrix.csv’ (‘4_extended_ad_matrix.py’).
Update the adjacency matrix (loop)
As with the initial model, unnecessary indirect edges are removed to ensure that the network, which has been expanded to include loops, is as simple and easy to understand as possible.
For the loop-extended model, the adjacency matrix must be updated using the procedure described in the “Initial model generation pipeline” section (updated adjacency matrix). Briefly, indirect edges were removed if an equivalent directed path composed solely of direct edges of the corresponding weight existed (BFS-based path check: ‘5_loop_up_matrix.py).
The resulting loop-specific outputs are provided as ‘loop_updated_adjacency_matrix.csv’ and ‘loop_modified_adjacency_matrix.csv’.
Create a file for yED (loop)
Finally, we export the updated loop network to yED to visually inspect how the newly added regulator integrates into the existing structure.
For this, the loop network was exported in a yED-compatible topology format. The file contains the following: (i) the regulator gene (column 1), (ii) the interaction sign, either “+” (activation) or “−” (inhibition) (column 2), (iii) the target gene (column 3), (iv) an empty spacer column (column 4), and (v) a full list of all genes (column 5). The loop topology table is provided as loop_topo.xlsx and can be opened in yED110 and exported to GraphML, as described in Crouch et al.23.
Evaluation of GenAI response
Two questions were asked to evaluate the response of GenAI. One question was how the GenAI model’s performance compared to random models. To answer this question, ten random models with specific settings were generated. Based on the iteratively generated GenAI model from Fig. 3, these included all nodes, as well as the number of edges and self-loops, having to remain the same. If a node had no incoming edges, the random model should also contain the same number of nodes with no incoming edges. This ensures that the free parameters remain the same for all models. Each model was adjusted and checked for goodness-of-fit based on Chi-2 value, p_value, BIC, AIC, and AICc (see Table 1). How this test was obtained is shown in the “Methods” section in the supplementary material.
The second question was how GenAI behaves deterministically when three additional genes (nodes) are added to an existing network (Table 2). This was merely intended to show whether GenAI remains sufficiently deterministic in its responses based on the prompt used and the settings applied. To this end, GenAI was asked to name three genes that might be suitable for the existing model (Fig. 3). The results demonstrated that the method is sufficiently deterministic, as the same three genes were consistently identified as potential regulators for the existing model in the queries. The selection of three genes was an arbitrary assumption without further methodological justification. The script explanation can be found in the supplementary material.