Many developers already use coding assistants like Github Copilot to help with code review and autocomplete. But what happens if you let AI write all the code?
This is where Cursor AI, an AI-powered code editor, can be useful. An AI-enabled integrated development environment (IDES) like cursors is the first wave of generator AI coding assistants that can use leading language models (LLMs) that vary depending on your context and needs. Explore the main features of the cursor and follow an 8-step tutorial to learn how to use the tools in your development workflow.
How does cursor AI work?
Cursor AI is built on Visual Studio Code, a popular IDE from Microsoft. Cursor offers additional VS code development capabilities and a user-friendly interface by integrating AI features such as the ability to query chatbots about code generation and codebase chatbots.
Cursor uses code indexes to increase the accuracy of your answers. By generating embeddings for each file, the cursor will better understand the code and lead to more relevant and accurate responses. The tool also supports multiple programming languages and is integrated with GitHub and is useful for a variety of use cases, including prototyping, bug fixes, code documentation, and more.
The three key features of cursor AI are particularly useful for developers. Agent mode, rules, and documentation.
Agent Mode
The default agent mode of Cursor allows the tool to act as an autonomous agent that creates content in the local file system.
The agent mode of the cursor allows you to break down complex tasks into smaller, more manageable steps. Autonomously analyze specific tasks, explore codebases and related files, plan how to resolve tasks, perform planned steps, and verify success.
Agent mode allows developers to assist with complex tasks such as debugging, optimizing code, generating test cases, and implementing new features. However, agent mode works best with clear steps and requires developer monitoring to ensure the success of the task.
Other modes of cursor include Ask Mode for AI search and queries. Manual mode for more accurate code changes and file targeting. Custom mode for more personalized AI support.
rule
When asking the cursor to create source code changes, such as adding buttons, changing toggle, or changing color schemes, it does not follow strict rules or processes. Instead, you can have a negative effect on your project if you just try to change your code and don't know which parameters the tool should follow.
Like many other generation AI tools, the cursor allows you to define a system prompt. The language model is a base set of instructions that should be followed in all conversations and in response to all user prompts. In cursors, this feature is called a rule.
A rule defines how the cursor agent behaves. LLMS does not retain memory to actions. The Rules feature addresses this limitation by providing a persistent, reusable context for each query.
Keep the following guidelines in mind when creating rules:
- Keep the rules concise – ideally less than 500 lines.
- Splits a wide range of processes into multiple configurable rules.
- If useful, provide a specific example or reference file.
- Avoid ambiguous guidance. The rules should resemble detailed internal technical documentation.
See this cursor directory for rules for different frameworks and languages.
document
Another approach is to add the document as a context. This ensures that Cursor will reference that information when writing code.
Adding documentation can be helpful if you are planning to develop applications with a new framework or programming language, as contexts help you understand your code better.
The cursor also comes with a predefined set of documents. These are highly recommended if you are working with a specific framework or coding language. For example, if you use cursors in the IAC tool Terraform, you can add a Terraform document to make sure you use the correct values.
Tutorial: Create a web application using a cursor
Follow this cursor AI tutorial to create a simple web application called LLM Sizer.
1. Install Cursor AI
You can install cursors on most OSes. It can be deployed using the Package Manager.
Mac: Brew Installation – Cask Cursor
Windows: Winget install -ID = anysphere.cursor -e
You can also download the app directly from the Cursor website.
Once you have downloaded and installed Cursor, you can access the main interface. Before starting the project, make sure you open the cursor over an empty folder on your device. This ensures that the cursor does not modify existing files or source code.
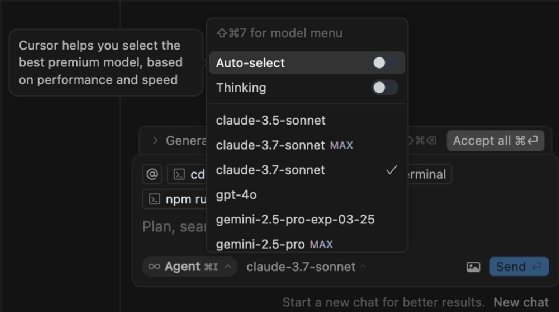
2. Select a language model
The cursor model picker includes a variety of LLM options, including multiple “thinking” models optimized for inference. It provides an autoselect option to dynamically select the model that best suits your task.
You can also manually select the language model to use. This tutorial uses Claude 3.7 Sonnet. This is great for writing code.
3. Develop a prompt
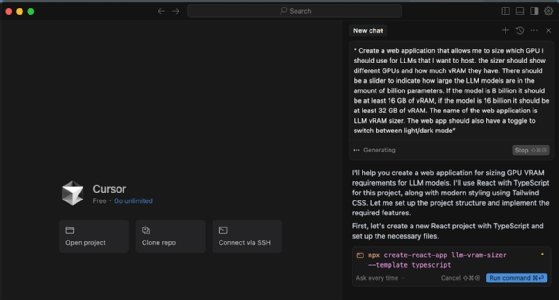
The prompt determines the style and setup of the web application. The more you explain, the more likely you are to get better results. In this tutorial, you will use the following prompts to create your application:
“Create a web application that can size the GPU to use for the LLM you want to host. The sizer should display different GPUs and their VRAMs. You need a slider to indicate the size of the LLM model. The web application is LLM VRAM SIZER.
4. Allow web application creation
Click if you click inputthe cursor writes a terminal command and asks for permission to execute it. This command creates a web application. You can also configure whether Cursor asks for permission for each action or whether it will automatically execute terminal commands.
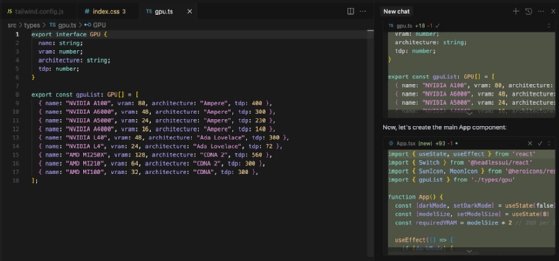
5. Check the code
For each file that Cursor creates, ask you to review the content before creating it on the file system. This is an essential step as AI can hallucinate. This means that you can generate false or misleading output. Having a human review code for quality, accuracy and compliance with requirements ensures that the code created is error-free and meets the needs of your project.
6. Start the application
After Cursor creates the source code, the application is started on the backend, and Cursor lists the endpoints that the application can use. As shown in Figure 4, the application is minimal.

7. Add a rule
You can create rules using New cursor rules By command or by going Cursor settings > rule. This will create a new rule file in .Cursor/Rules directory. setting The menu also displays a list of all rules and their status.
To demonstrate how important the importance of the effectiveness rules is in the resulting application, use this rule on the Cursor Directory website above.
“React cursor rules [email protected]”
After applying the rules, issue the following command:
Recreate the web application
Adding that particular rule and enabling cursors to replicate your website will give you a much cleaner and more refined UI compared to the original website. This is because this rule gave Cursor a better context about how the application was developed and the web development framework to use.

8. Add the document
Finally, add relevant documents to provide the cursor further into context.
For example, you can add it by entering the Tailwind CSS cheat sheet here Cursor → Settings → Cursor Settings → Function Scroll to the Documents section.
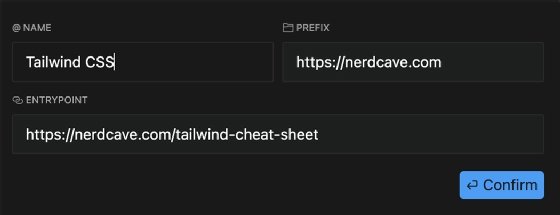
Once you have added the document, you need to reference it to use the cursor. You can do that by opening a chat window and typing “@docs” Select the Tailwind CSS document from the list. You can then browse the document in the cursor chat.
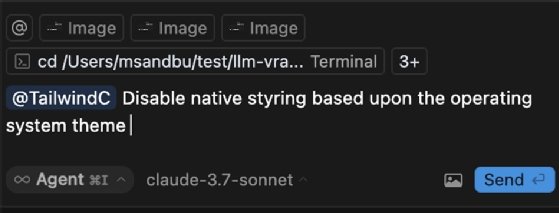
Be aware of other items that appear in the list. These are predefined documents from cursors such as AWS or Pytorch. So, for example, if you are developing for AWS, you should refer to the AWS documentation. Regardless of the language model you use, detailed knowledge of all AWS-specific components is not essential.
Marius Sandbu is a cloud evangelist at Sopra Steria in Norway, focusing primarily on end-user computing and cloud-native technologies.