
Langchain helps you build agents and other types of AI applications. However, developers need to understand their installation and construction steps and use them well.
Langchain is an open source framework for connecting data, software utilities and other LLMs with large-scale language models (LLMs). This is done through a variety of pre-built tools and integrations that allow developers to easily implement the functionality they need to build AI applications.
Langchain is particularly beneficial for agent AI development. Langchain allows users to create AI agents that can pass human requests to LLM. LLM processes the request and determines which tools or commands are required to satisfy it. The agent automatically executes the task.
This Langchain tutorial for beginners will explain the basics of installing Langchain and how to build an agent that can use Langchain's file system tools to manage files on your local computer.
Install Langchain
Before building an agent or other AI application, developers need to get used to the simple installation process of Langchain.
All the commands in this article were tested on Ubuntu 25.04 systems, but most work on OSs that support Python 3. The only exception is the sudo APT command used to install Python 3 and Python package manager Python 3 and Python. Apt-Get is a software installation utility for Ubuntu. Users running non-Ubuntu OSs should install these two packages using the system-supported installation method.
First, install Python 3 and PIP.
sudo apt updatesudo apt install python3 python3-pip
Next, install the Langchain package using PIP.
pip install langchain
Test the Rung Chain
To test that LangChain is properly set up, run some simple code that sends queries to LLM from within the terminal. Developers can run the following commands directly in the Python console, but running them within a Jupyter notebook may be more convenient and may allow for a more interactive approach.
First, install the Langchain package for your LLM. This tutorial uses Google's Gemini model, but Langchain supports a variety of models.
Install the Gemini package:
pip install -qU "langchain[google-genai]"
Next, run the following command to import the modules needed to interact with Gemini: These commands also prompt the user to enter the Gemini API key. Developers can create it here.
import getpassimport os
if not os.environ.get("GOOGLE_API_KEY"):
os.environ["GOOGLE_API_KEY"] = getpass.getpass("Enter API key for Google Gemini: ")
from langchain.chat_models import init_chat_model
model = init_chat_model("gemini-2.0-flash", model_provider="google_genai")
from langchain_core.messages import HumanMessage, SystemMessage
Then, use the .Invoke method to pass the query to gemini. For example, the following command asks Gemini when the French Revolution began:
Model.Invoke (“When did the French Revolution begin?”)
Figure 1 shows Gemini output based on the code running inside a Jupyter notebook.

Build an AI agent with Langchain
In the above tutorial, we showed you how to use Langchain to send a message to LLM and view a response. However, LLM didn't create an agent because it wasn't connected to a tool that allowed the command to be executed.
In the next tutorial, you will use Langchain to connect to LLM and integrate with the tools. Specifically, it uses a file system tool that provides the commands needed to manage files on your computer. Agents can read, write, and delete files based on natural language input from the user.
1. Integrate LLM
Install the integration with LLM to guide the agent. This tutorial uses Gemini.
pip install -qU "langchain[google-genai]"
Next, set the LLM API key.
import getpassimport os
if not os.environ.get("GOOGLE_API_KEY"):
os.environ["GOOGLE_API_KEY"] = getpass.getpass("Enter API key for Google Gemini: ")
from langchain.chat_models import init_chat_model
model = init_chat_model("gemini-2.0-flash", model_provider="google_genai")
2. Set up the tool
Install and configure the desired Langchain tool. As mentioned above, the tools in this tutorial are file systems that allow you to interact with files on your computer.
The file system tool is part of the Langchain-Community package. Install with the following command:
pip install -qU langchain-community
Next, import the modules needed to use the file system.
from langchain_community.agent_toolkits import FileManagementToolkit
Next, set up a working directory that maps the file system to the directory on the local file system of the host computer. In this tutorial, we will use temporary directories as it is not recommended to provide tool access to directories containing important files without deploying Security SafeGuard.
Set the directory.
from tempfile import TemporaryDirectoryworking_directory = TemporaryDirectory()
Finally, enable the tool.
tools = FileManagementToolkit(root_dir=str(working_directory.name),
selected_tools=["read_file", "write_file", "list_directory"],
).get_tools()
3. Build an AI agent
Both the Langchain LLM integration and the tool setup allow developers to create agents.
As a prerequisite, install Langgraph, an AI agent framework developed by Langchain, which is not provided in the default Langchain package:
pip install -U langgraph
Next, bind the LLM defined in the first section of this tutorial to the tool defined in the second section.
model_with_tools = model.bind_tools(tools)from langgraph.prebuilt import create_react_agent
agent_executor = create_react_agent(model, tools)
This join generates an AI agent.
4. Run the AI agent
The agent can now perform the task.
Change the content value of the agent to send a request input_message variable. For example, the following code lists the files in the current working directory and asks the agent to print the response:
input_message = {"role": "user", "content": "List files in the current working directory"}response = agent_executor.invoke({"messages": [input_message]})
for message in response["messages"]:
message.pretty_print()
Figure 2 shows what the output looks like.
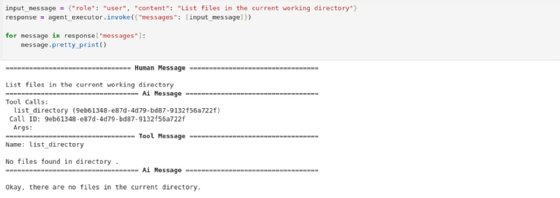
Figure 2 shows that the tool did not find the file in the directory. This makes sense because there's nothing yet. The tool reported this finding to LLM and generated responses accordingly.
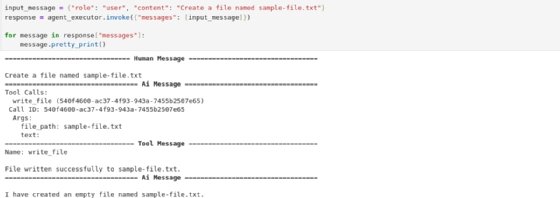
Next, send a request to ask the agent to create a file named sample-file.txt.
input_message = {"role": "user", "content": "Create a file named sample-file.txt"}response = agent_executor.invoke({"messages": [input_message]})
for message in response["messages"]:
message.pretty_print()
Figure 3 shows an agent that creates files according to the request.
Next, ask the agent to state the files in the directory.
input_message = {"role": "user", "content": "Print the names of files in the working directory and their contents"}response = agent_executor.invoke({"messages": [input_message]})
for message in response["messages"]:
message.pretty_print()
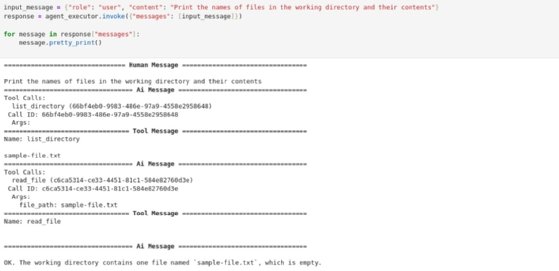
The directory now contains named files, as shown in the agent response in Figure 4 Sample-file.txt.
5. Explore more complex use cases
The above tutorial showed the basics of setting up Langchain and building an AI agent. However, this is a simple example where an agent performs only basic tasks. That is, you manage your files on your local file system.
This represents a small part of what Langchain can do. To understand the other use cases that Langchain AI agents can support, take a look at the complete list of Langchain tools. Langchain can be integrated with a variety of websites, search engines, software development tools, and more, and can use AI agents to automate various tasks.
Chris Tozzi is a freelance writer, research advisor, IT and society professor. He previously worked as a journalist and Linux system administrator.


